![]()
Background
Event Ticketing is an app by Guest Manager that enables you to sell event tickets on your Shopify store. This includes generating and delivering scannable, branded and barcoded tickets to your customers, a mobile app to scan and validate tickets at the door, and more. We believe this is the future of selling tickets online, due to the lower cost compared to traditional ticketing companies, far superior marketing tools, control of your own brand, customers, and data, and finally, control over your money.
-
Shopify App Release Date: October 2019
-
Merchants Using the app: 1,000+
-
Company Start Date: November 2011 (9 years in business)
Why us
Our Shopify app is new (launched in October 2019), but we are not! We’ve been in business serving event organizers since 2011. We understand that timely and helpful support is paramount to your success. You can reach us at any time directly through the chat widget in the app, or email us at support@guestmanager.com. Thousands of large companies, festivals, and event producers rely on us every day to ensure their events are successful.
- Your brand at the forefront. Nowhere do we advertise our company on customer facing features. It’s your event, they’re your customers, so the design and interactions that your customers have with the solution should be 100% you.
- Rock solid, proven check in and scanning app. Check in is not an afterthought for us. We put a lot of development resources into making an easy to use, realtime, stable, and scalable app to check in or scan tickets - whether your event is 100 guests or 100,000.
- Full suite of event management tools. Our backend features, available in the Premium or Business plans, have a plethora of features beyond just selling tickets. Import guest lists, create and email comp tickets, add guests on the fly, print name badges, collect RSVPs and issue private invitations, build an event website portal, event calendar, recurring events, and much more! If you have any questions about how our software can help your business, please get in touch.
For merchants
- Ease of integration Follow our simple guide and get set up in minutes.
- Low touch, it just works Orders and tickets are fulfilled automatically. Event Ticketing does the work for you, so you don’t have to
- Affordable - Traditional ticketing companies charge upwards of 2-5% plus $1-$3 per ticket!. We think that’s crazy. We believe in staying lean and smart, so we can provide ticketing software to you at a much more affordable rate. On the other hand, be wary of apps that charge too little! They usually won’t be around for long.
For partners and agencies
Take confidence in knowing that we will always be here, ready to support you during the integration phase, and knowing that we will continue to support your clients once the handoff is made.
- Integration support - we won’t leave you hanging!
- Excellent help documentation
- Custom development - if your client has specific needs, get in touch. We love exploring how to make our apps work better for all audiences.
- Live chat support - Let us be the front line, taking the burden of merchant support
For Shopify Plus
Performance, scalability, and reliability is paramount. We have years of experience doing large festival ticketing onsales with our own ecommerce platform, where thousands of tickets are purchased in seconds. If we can handle the entire purchase experience end-to-end for large onsales - from loading the event page to processing the payment - then we can definitely take the smaller role of generating and delivering tickets with our Shopify integration. Trust Shopify to process your orders, and trust Event Ticketing to generate your tickets, and provide reliable onsite ticket scanning. Together, Shopify and Event Ticketing make the perfect platform for selling tickets online!
We are also working towards becoming a certified Shopify App (TBA)
For event organizers using other platforms
Oh boy, I could write a book on the benefits of switching from a traditional ticket platform such as Eventbrite or Brown Paper Tickets, to Shopify + Event Ticketing. The key benefit are:
- You own your customer data. It’s disappointing that other ticketing platforms use your hard marketing efforts for their own benefit.
- You get paid as you make sales. Make a sale today? Great! It will be in your bank account in a day or two. Stop waiting until after the event to get paid.
- Unmatched ease and flexibility for design - design your own website, with no ticketing platform branding
- Shopify app ecosystem and marketing tools - No ticketing platform will ever come close to the marketing and audience growth tools that Shopify can provide you
- The best check in and ticket scanning app in the industry - Simple, easy to use, and reliable, we actually care about our scanning tools, whereas other ticketing companies treat it as an afterthought.
- Merchandise bundling - Shopify is an e-commerce platform, and naturally excels at selling product more than any other ticketing platform.
What this guide covers
Upon completing this set up guide, you will have done:
- Created an event with tickets for sale (GA, VIP, etc)
- Create an event page for customers to purchase tickets on
- Design your own PDF and Apple wallet barcoded tickets so customers can download them upon purchase
- Set up the ticket scanner app on your phone to scan and validate tickets
[insert screenshot]
Install the app
If you don’t yet have a Shopify account, please create one. Shopify offers a 90 free trial. Shopify is an ecommerce platform, and when paired with Event Ticketing, is the future of selling tickets online!
Create an event
Navigate to the New event form. This can be accessed from Events in the main menu at the top, or from the Overview tab.

Event details
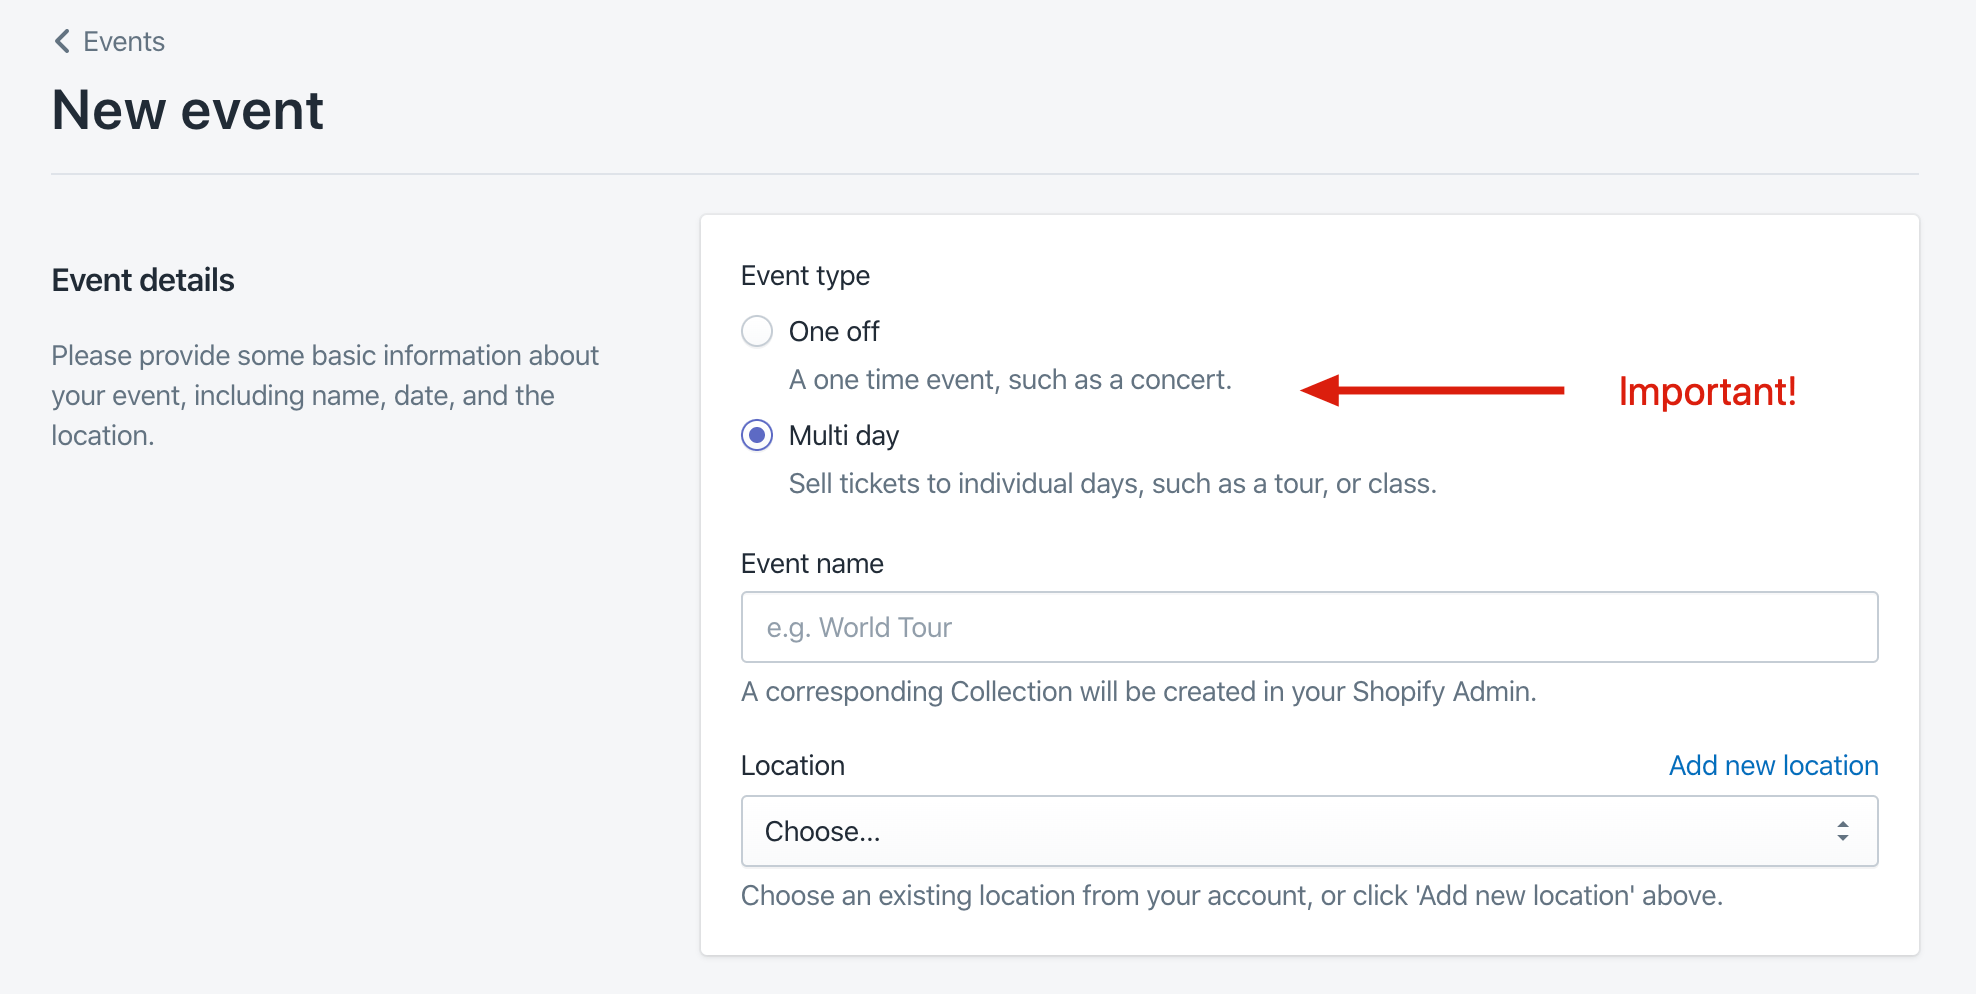
- Type: For most cases, the one-time option is the right choice. If you are selling tickets to separate days that will require separately issued tickets (to be scanned for each date), then consider the multi-day event. If you are running a multiday festival but are only scanning tickets on the first day (and issuing a wristband for subsequent days), then a one-time event that spans multiple days is the right choice!
- Name
- Location. Click “Add new location” to setup a new one if it’s not already there. Only Name and time zone are required.
- Date. Use the calendar and time drop-downs to set when your event begins and ends. If it spans multiple days, click the checkbox to reveal two calendars to aid in selecting a date range.
If you selected a multi-day event, you will see an additional section called Dates. Use this to add a time slot for each event. For example, if you have 10 time slots throughout the day, you would have 10 dates. If you are creating a tour with 5 dates over a few months, you will have 5 dates. The app will intelligently create variant options based on a time, date, and location. For example, if all Dates occur on the same day and at the same location (e.g. Jan 25th), then we will set up one dropdown total (option) for Time. If you create 5 dates across a few months, across different locations, we will create a dropdown for Date, and Location (location only if there are multiple events on the same day at different locations). Whew!
Adding tickets for sale
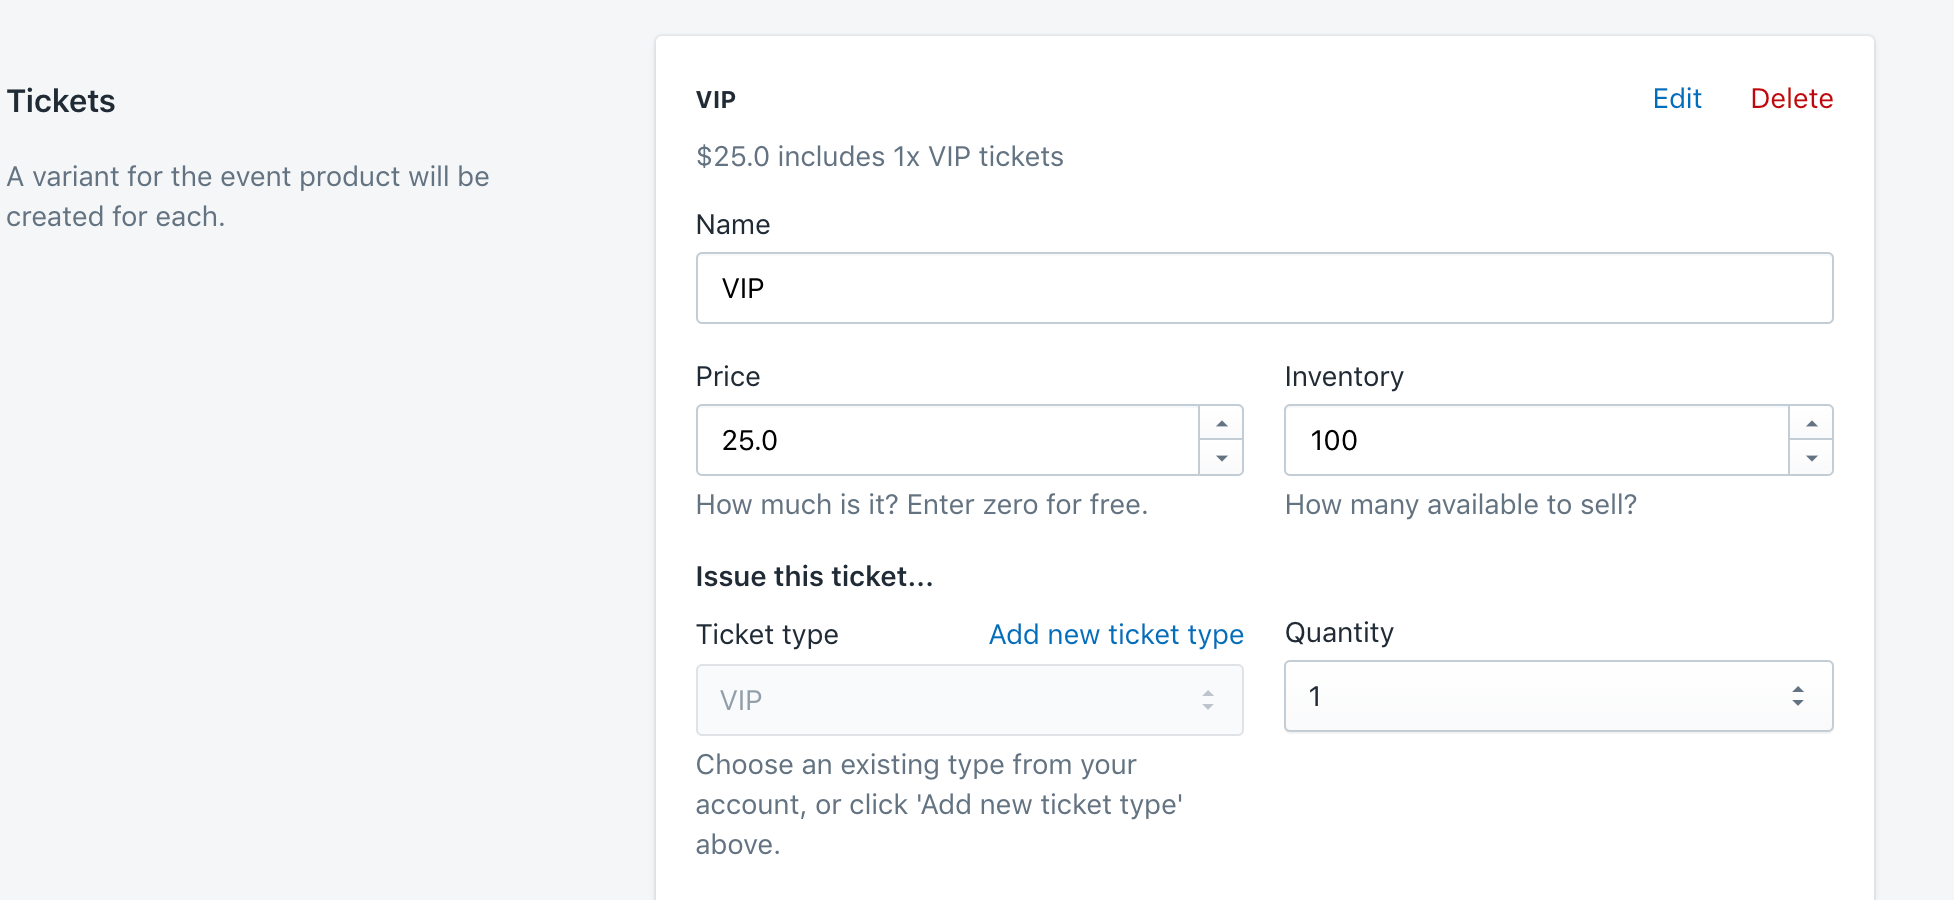
This next section is very important. Add a ticket for each price point. For example, you might add multiple tiers of General Admission tickets, and then another VIP or group package ticket.
- Name: Typically a longer format, such as “General Admission Early Bird”. This will be the name of the variant, and only visible on the store and order confirmation emails.
- Price: Enter a price, or enter 0 for free tickets (free tickets require either a Premium or Business monthly subscription - as there is no $1 fee on free tickets)
- Inventory: How many of these tickets do you have available to sell? For unlimited inventory, set this to 0 for now, and then edit the varint in Shopify, unchecking the box “track quantity”.
- Ticket type: The kind of ticket to issue to the customer. This is what’s visible on the PDF or Wallet, and on the Check in / ticket scanning app. This should be short and sweet, e.g. “GA” is perfect when selling a ticket named “General Admission…” above.
- Quantity: How many tickets to issue for each variant sold. For example, if you set inventory to 100, and quantity to 3, you can sell 100 of these variants that each include 3 tickets, so 300 total tickets.
Don’t worry, you can revisit this page at any time to edit, add, or remove tickets for sale.
Go ahead and click Save, and proceed to the next step: Customizing your PDF and Apple wallet tickets.
Customize your event
Let’s set up the downloadable ticket that customers will receive after purchasing tickets. You can set up both PDF and Apple wallet templates, and you’ll want to set up at least one - without it, customers can’t download tickets!
PDF ticket
Setting up PDF tickets is a great opportunity to add another touchpoint for your brand, or sponsors. You have full control over adding graphics, text, and colors.
If you are subscribed to one of our paid plans, you can also setup and customize these templates directly from the Guest Manager app, which offer additional customizaton options such as disclaimers, content sections, field toggling, and more.
Benefits of paid plans for PDF tickets:
- Can re-use past templates
- Can customize (toggle) certain fields
- Can add custom content and graphics such as sponsor logos, venue maps, etc
A PDF design will need to be setup in order to send scannable tickets to your customers.
From the event page, you will see a blue banner if you haven’t set up the design yet. Click “Set up” to begin.
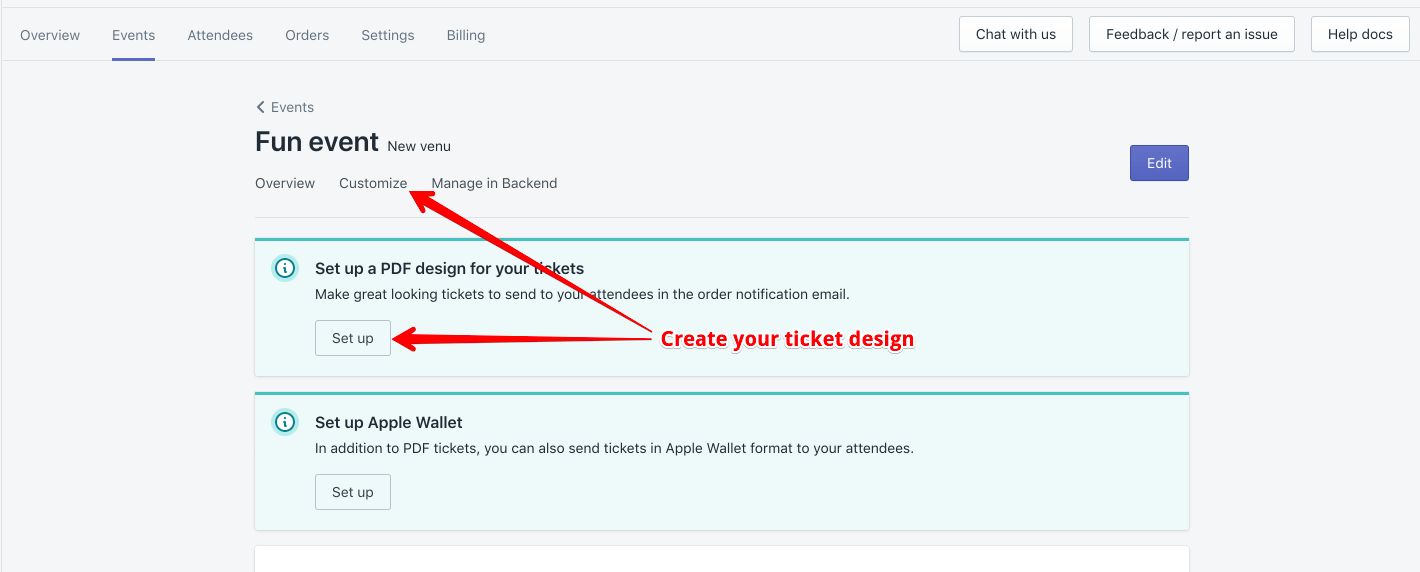
Next you see a screen with two design options.
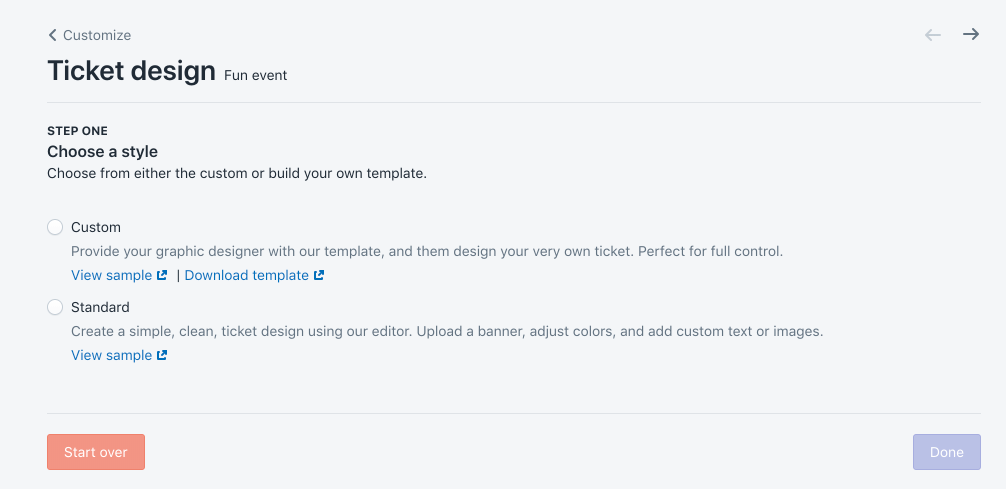
The custom style will let you have maximum control over the design, but you will need a graphic designer.
The standard style can be created without a designer, and looks very similar to an Apple wallet ticket.
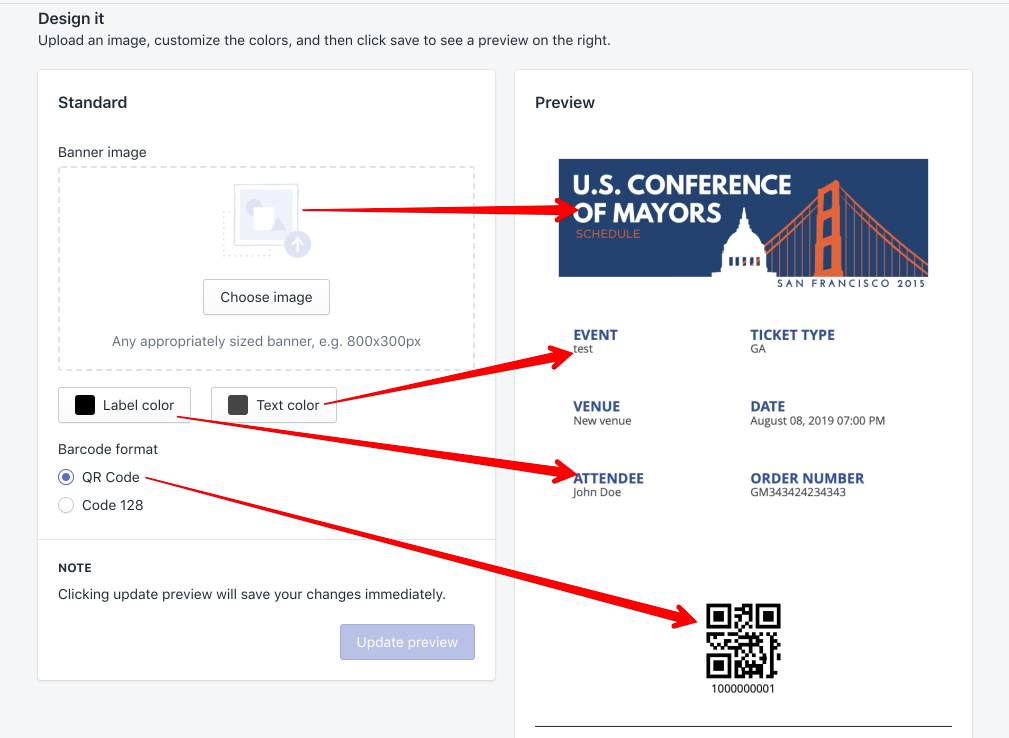
Standard style
Red arrows have been drawn to illustrate which settings affect what.
Simply choose a banner image, pick colors, and click Update preview. The right side will refresh with a sample, along with a link to download a real sample.
Custom style
Our clients have created stunning tickets using the custom design feature. This is how it works:
- Give the template to your designer, and instruct them to not design anything inside of the grey box.
- Upload the new design, and our software will automatically render in the attendee details and scannable barcode into the grey box as tickets are issued. Note: the grey box is not rendered in the final ticket, it exists solely as a guide.
Custom template specifications
- Dimensions: 1275x1650 pixels
- Format: JPG
- Size: Please keep under 500kB to ensure tickets are generated quickly
- Download template
- Download sample ticket
Instructions Design around the gray box. The gray box is where dynamic info will be inserted, such as the name, barcode, event info, etc. You may delete the gray box, it is there as simply a visual guideline on where it’s safe to edit. Ensure the barcode is not obstructed and has a clean white background and margin of at least a quarter inch. Once you design the ticket, it’s highly recommended to scan and test a sample ticket.
Apple wallet ticket
Apple wallet is a great way to provide more convenience to your customers, and increase scanning throughput at the event.
Go into the Customize section of the event, and click Set up for the Apple wallet design.
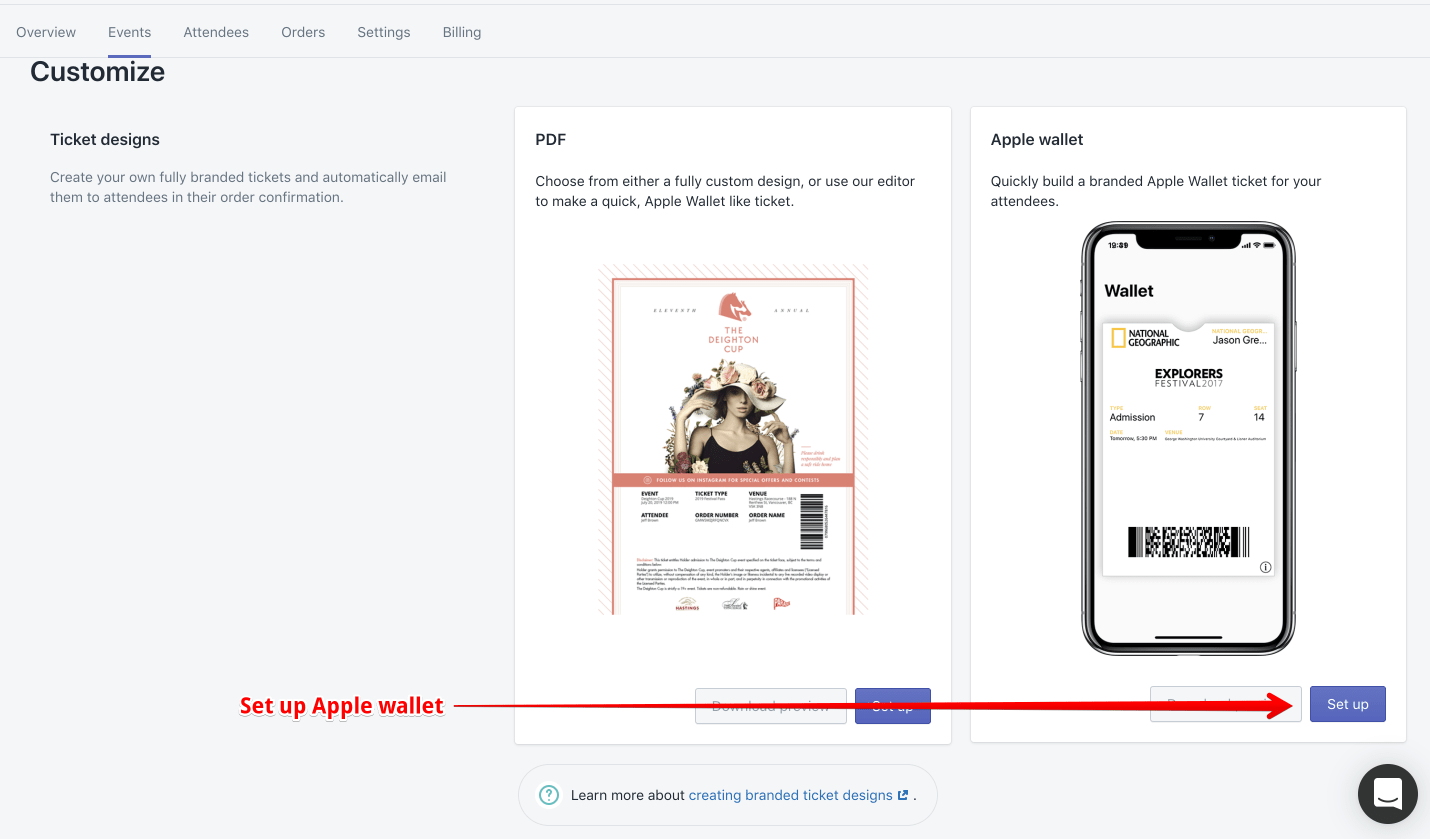
The system needs three graphic files to proceed:
- Banner
- Logo
- Icon
For convenience, we’ve provided links to download samples for all three if you’d like to quickly try out the feature.
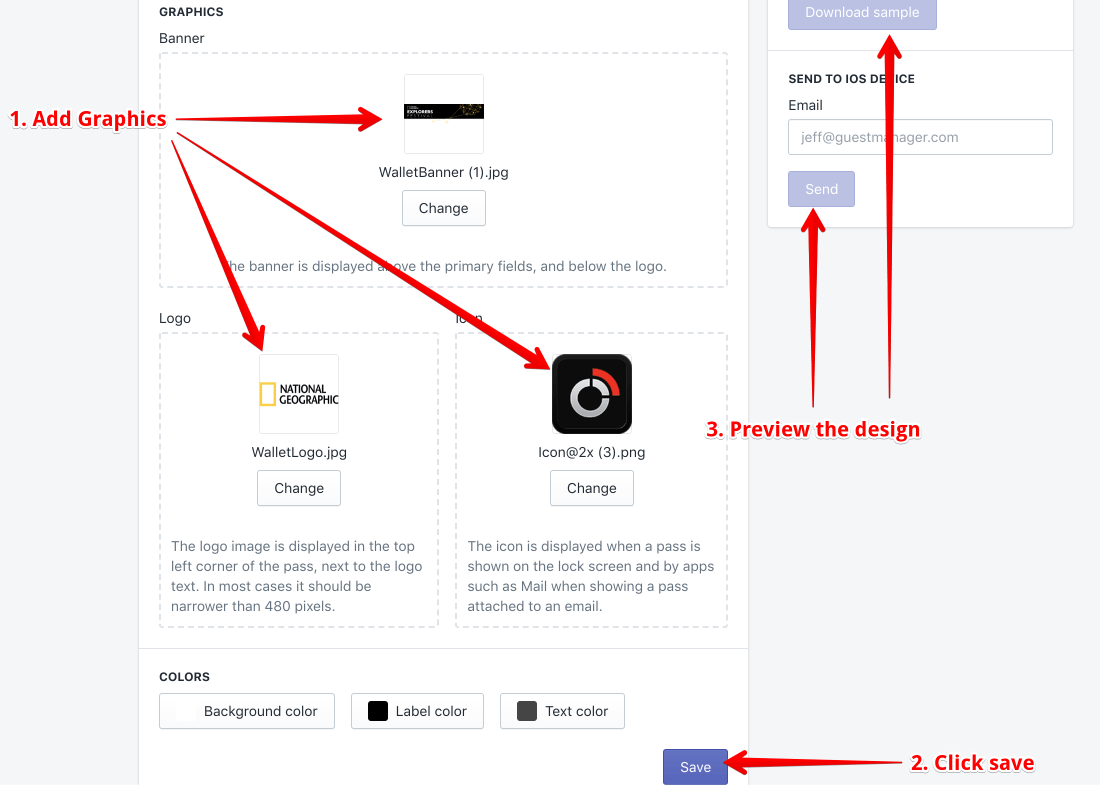
Once you’ve added the three graphics, choose colors and click Update preview.
Due to technical limitations, we cannot provide live previews of the wallet design, but you can preview it in two ways:
- Click download sample: Requires that you are on a Mac or iOS device to view it
- Enter an email address in “Send to iOS device” where you can send the preview directly to your iPhone.
Checkout confirmation page
After customers complete the online purchase and arrive on the thank you page, they are presented with their tickets ready to download:
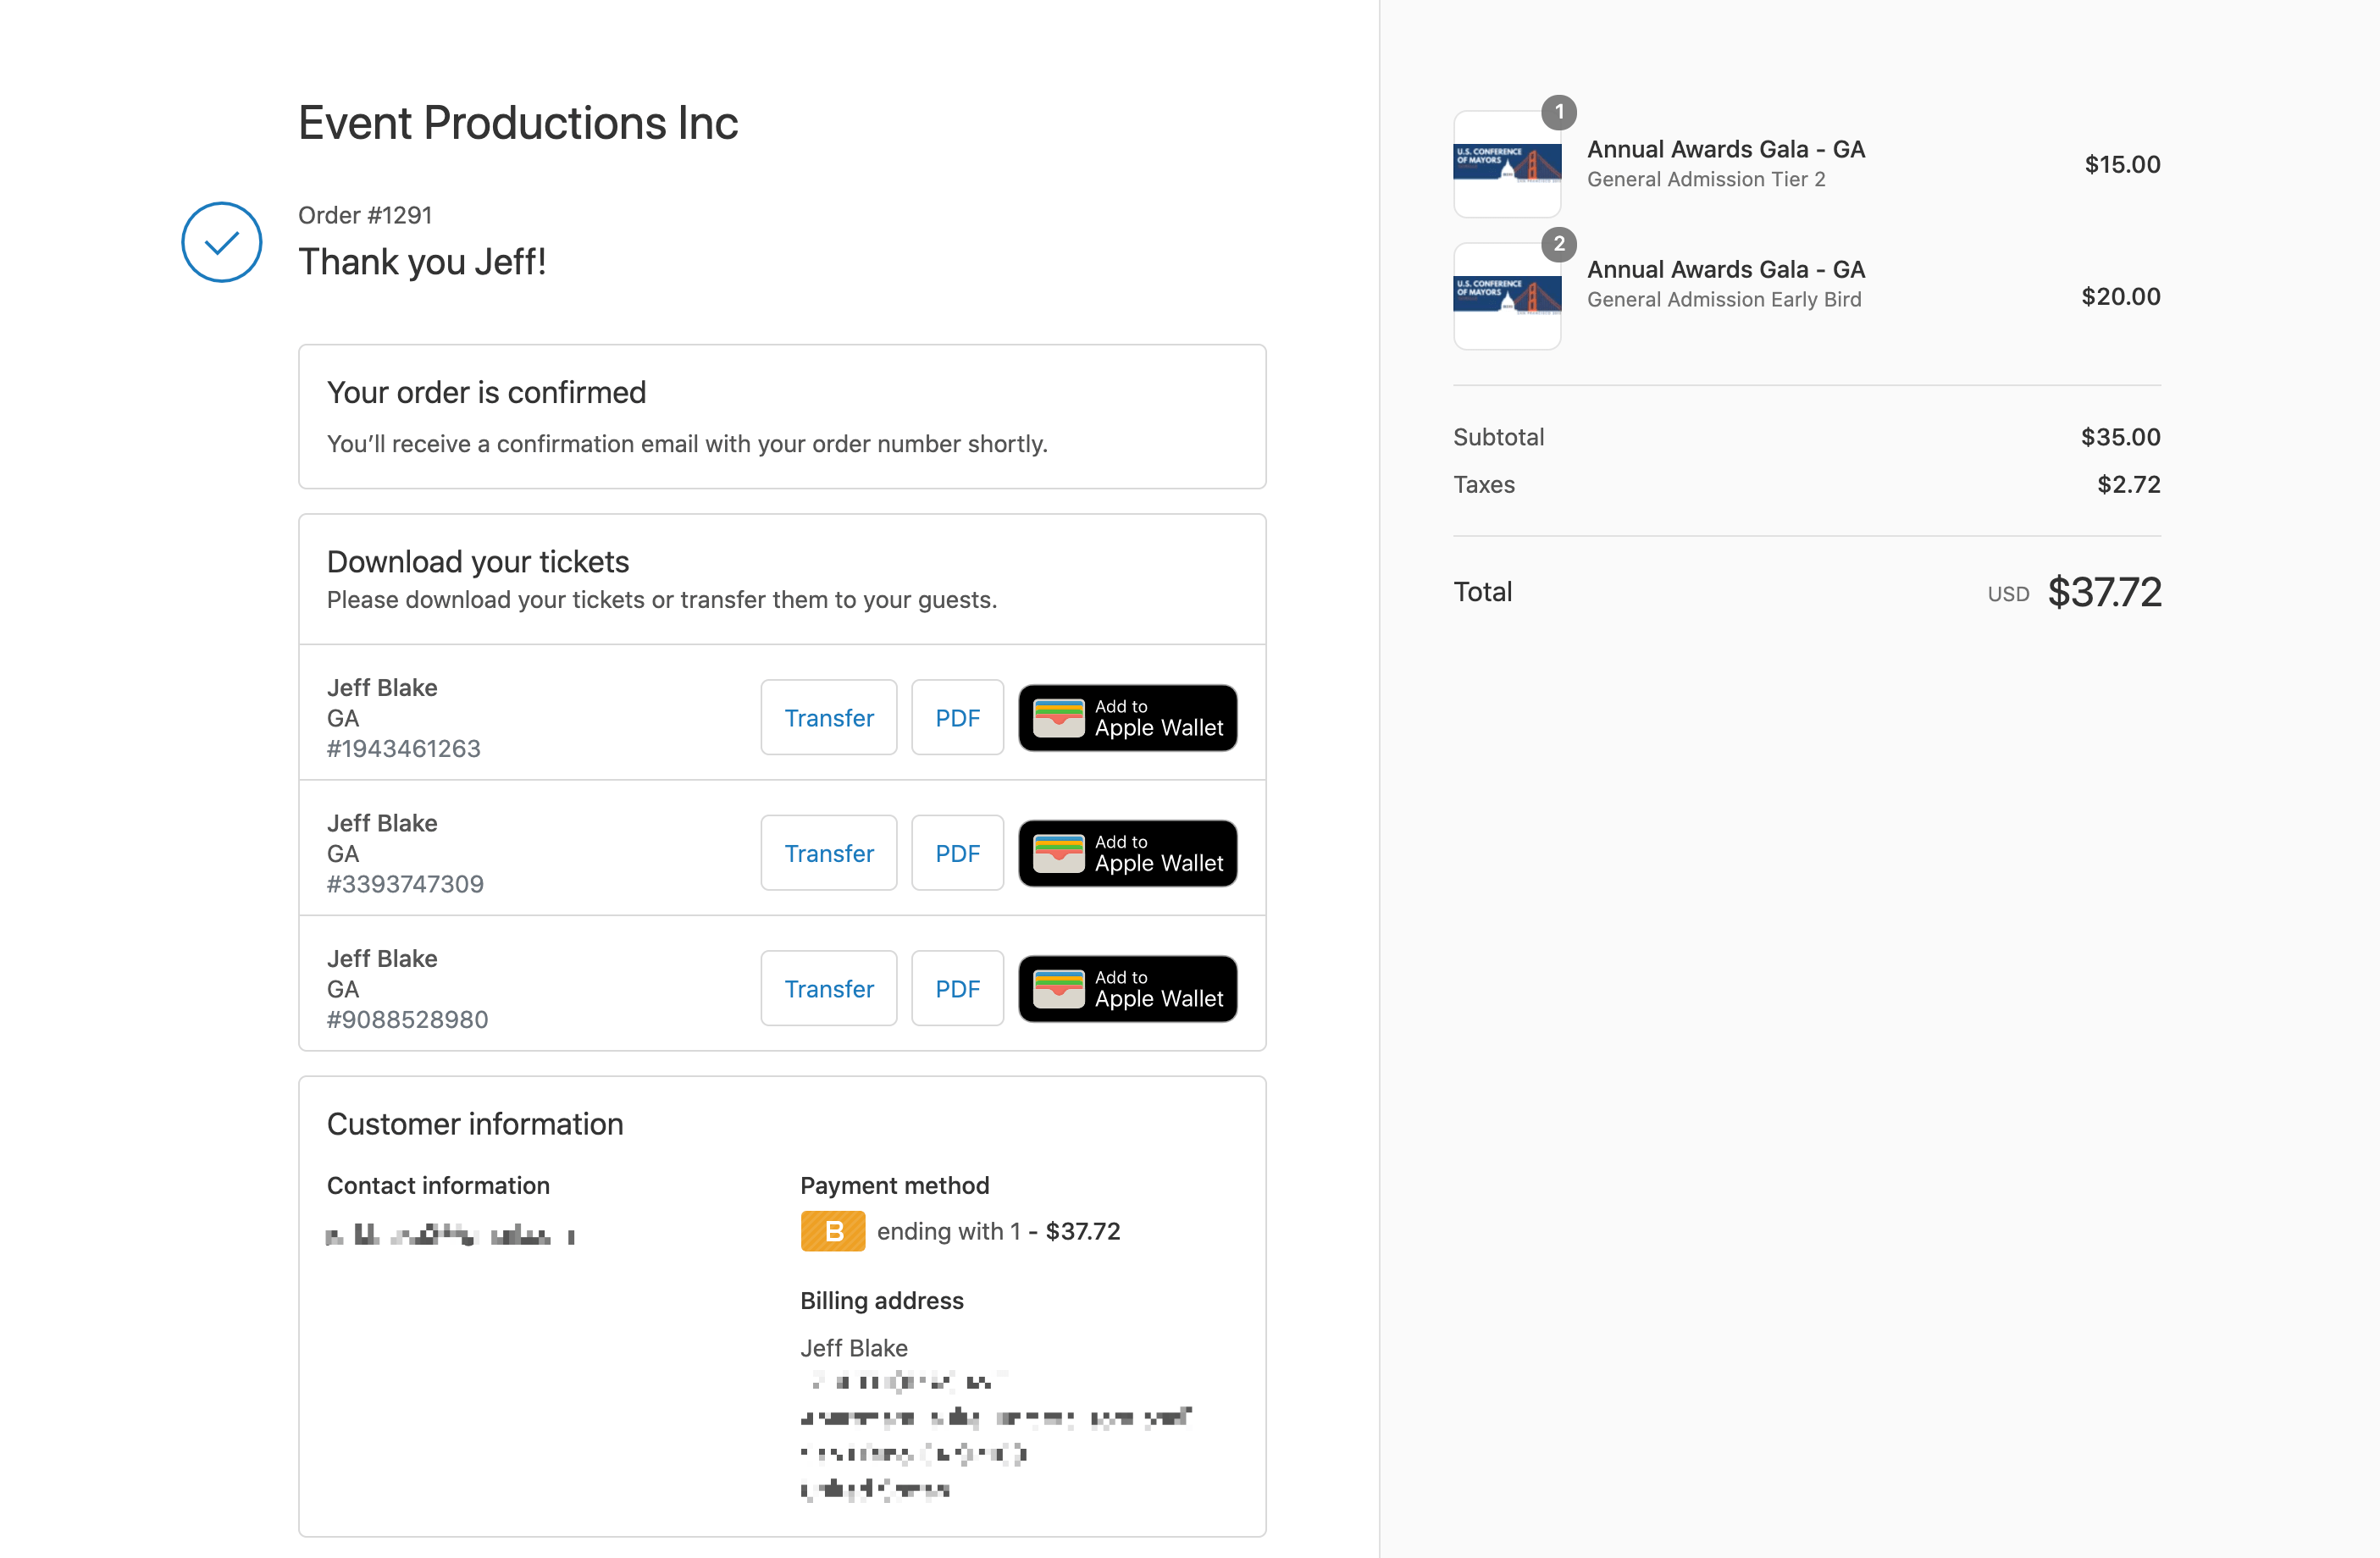
The app automatically hooks into the official Shopify checkout page for a seamless customer experience.
You can customize the text shown here, and other things, in the Settings section of the app.
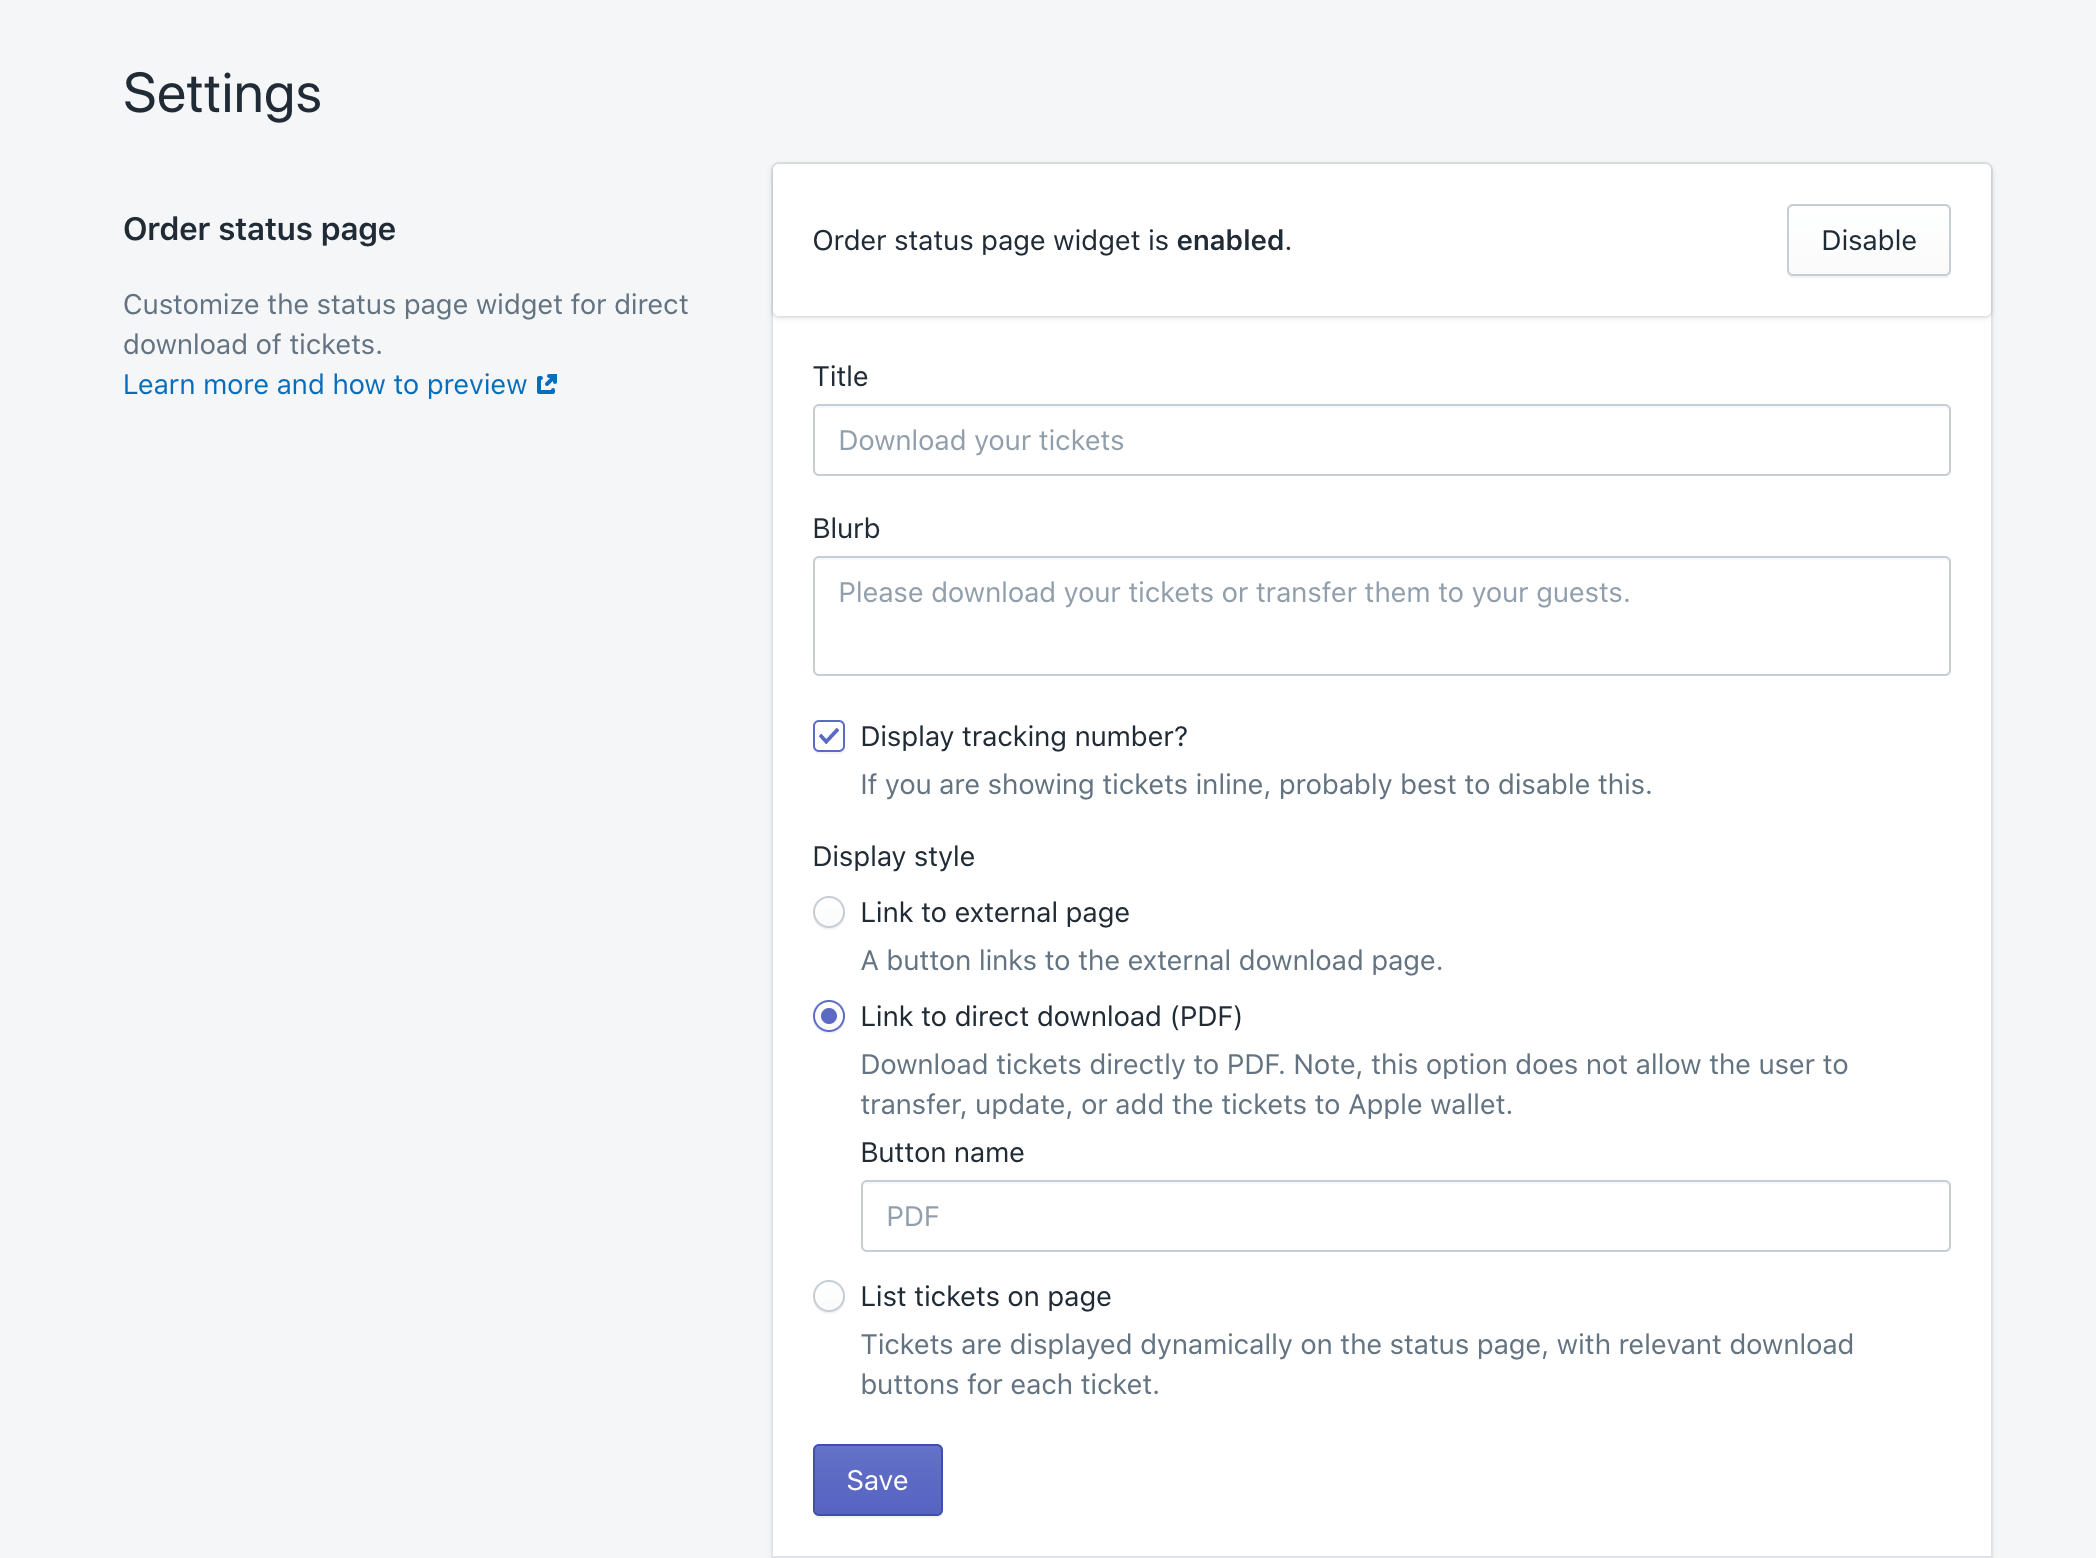
Email and SMS confirmations
You may also want to make small adjustments to the Shopify order notification email/SMS template, and the Point-of-sale notification template. The app hooks into the Shopify emails as opposed to sending our own. One less thing to customize, and one less email for the customer! Learn more about integrating with the Shopify notification templates here.
Collect attendee information
We’re strong proponents for keeping the checkout process as simple as possible. Therefore, we do not support collecting additional fields during the checkout process (don’t agree? Change our minds!). Having said that, you can collect additional info from attendees post purchase.
- Collecting attendee information (how to)
Event page theme, layout
Coming soon. At the moment the app does not provide any features for styling the event page - this is up to you by editing the Online store and/or theme files in Shopify. Soon, the app will provide event page templates similar to what you’d see in other ticketing platforms: list each ticket option, quantity dropdown for each, and purchase.
Test order on your store
You’ve made it this far! Our work in the Event Ticketing app is mostly done now. From now on, you interact primarily with the Shopify admin, as you are used to: creating draft orders, purchasing tickets on the storefront, managing orders, refunds, cancelations, etc - this all takes place in Shopify.
View the created product
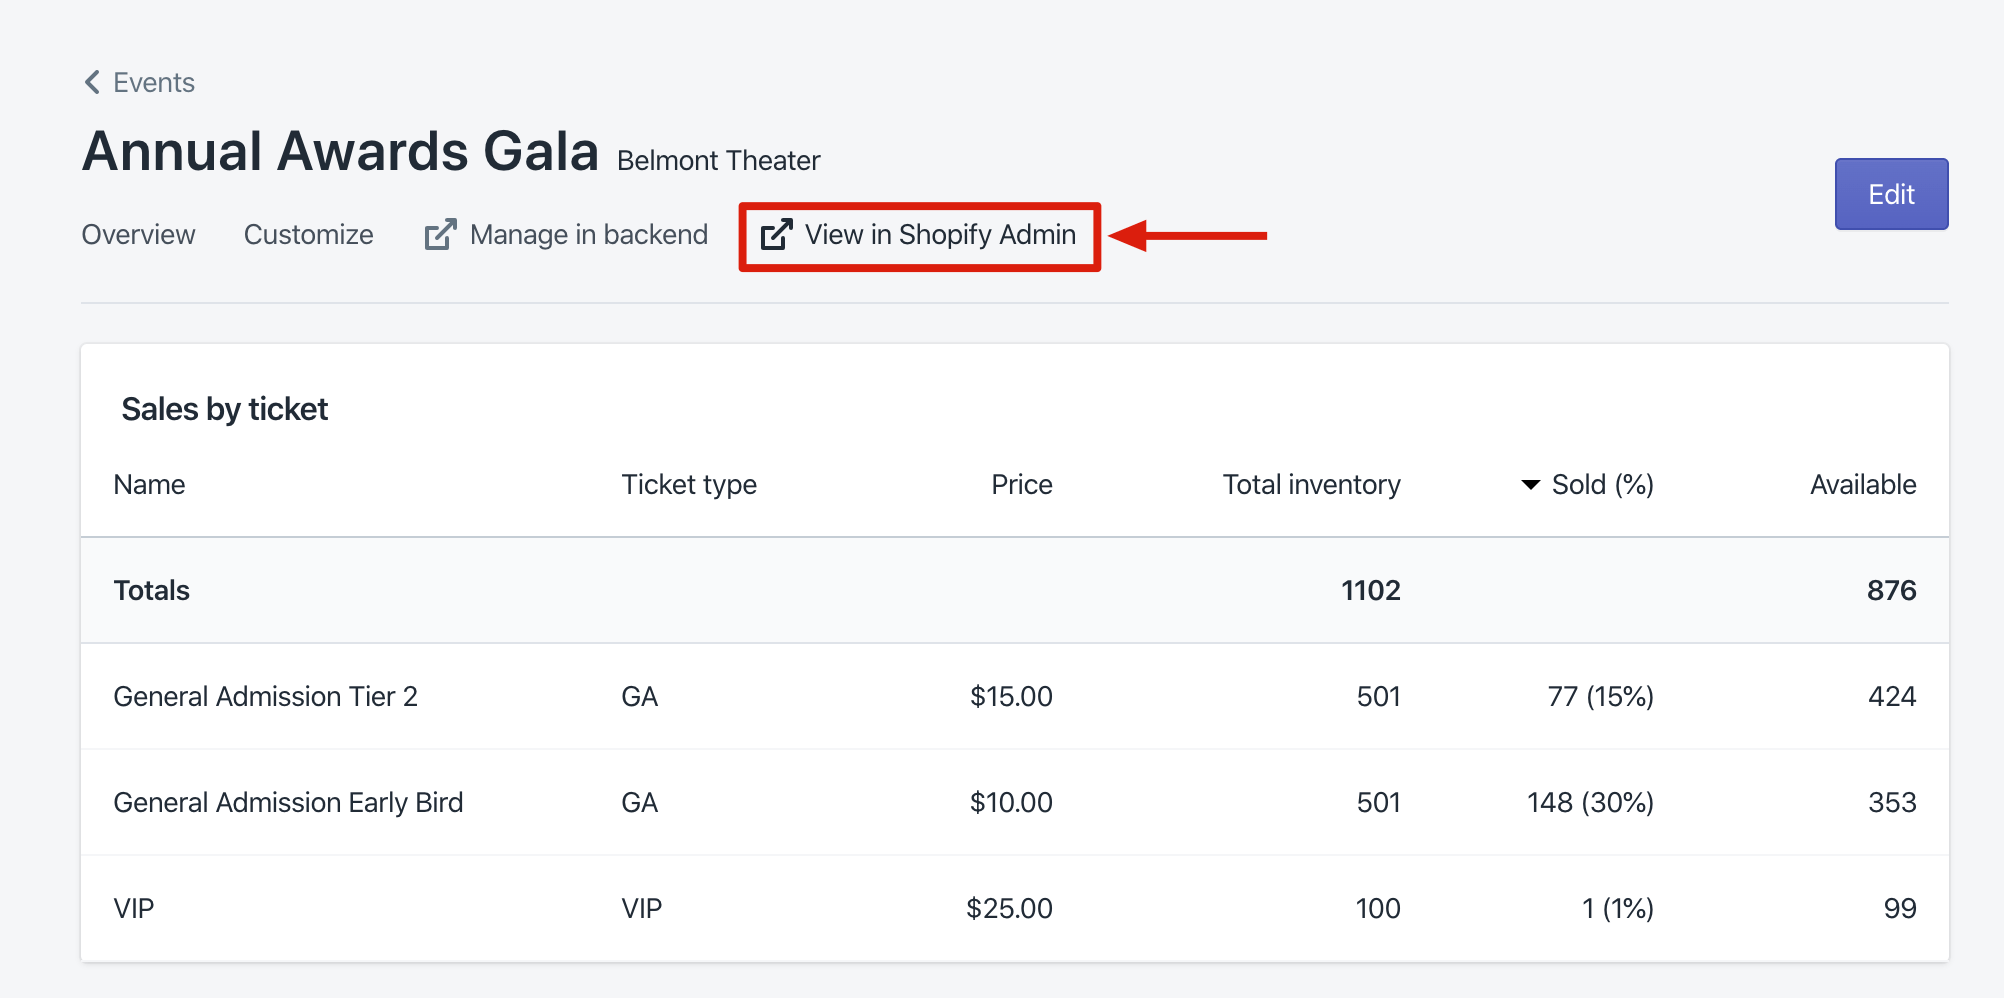
From the main events list:

Or from the event itself:
This page should look familar. It’s the product page in your Shopify admin. Since Event Ticketing creates standard shopify products, many of the same tools and editing capabilities you are used to are all available.
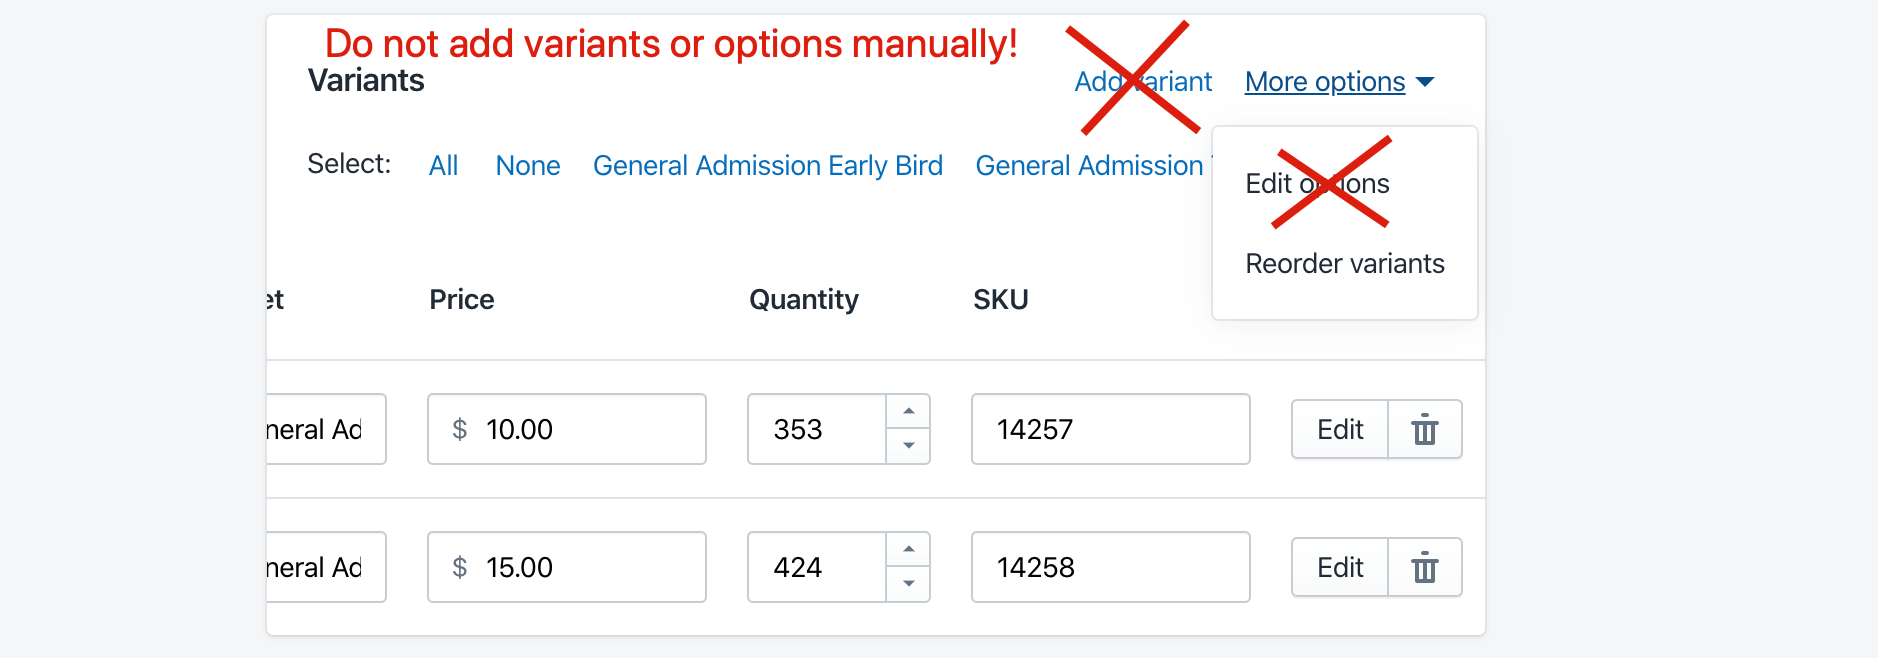
In general, it is safe to edit any content from the Shopify Admin (title, description, images, collection, etc). It is not safe to add or edit variant options, or add variants. All variants must be created by the Event Ticketing app, from editing the event and adding ticket tiers.
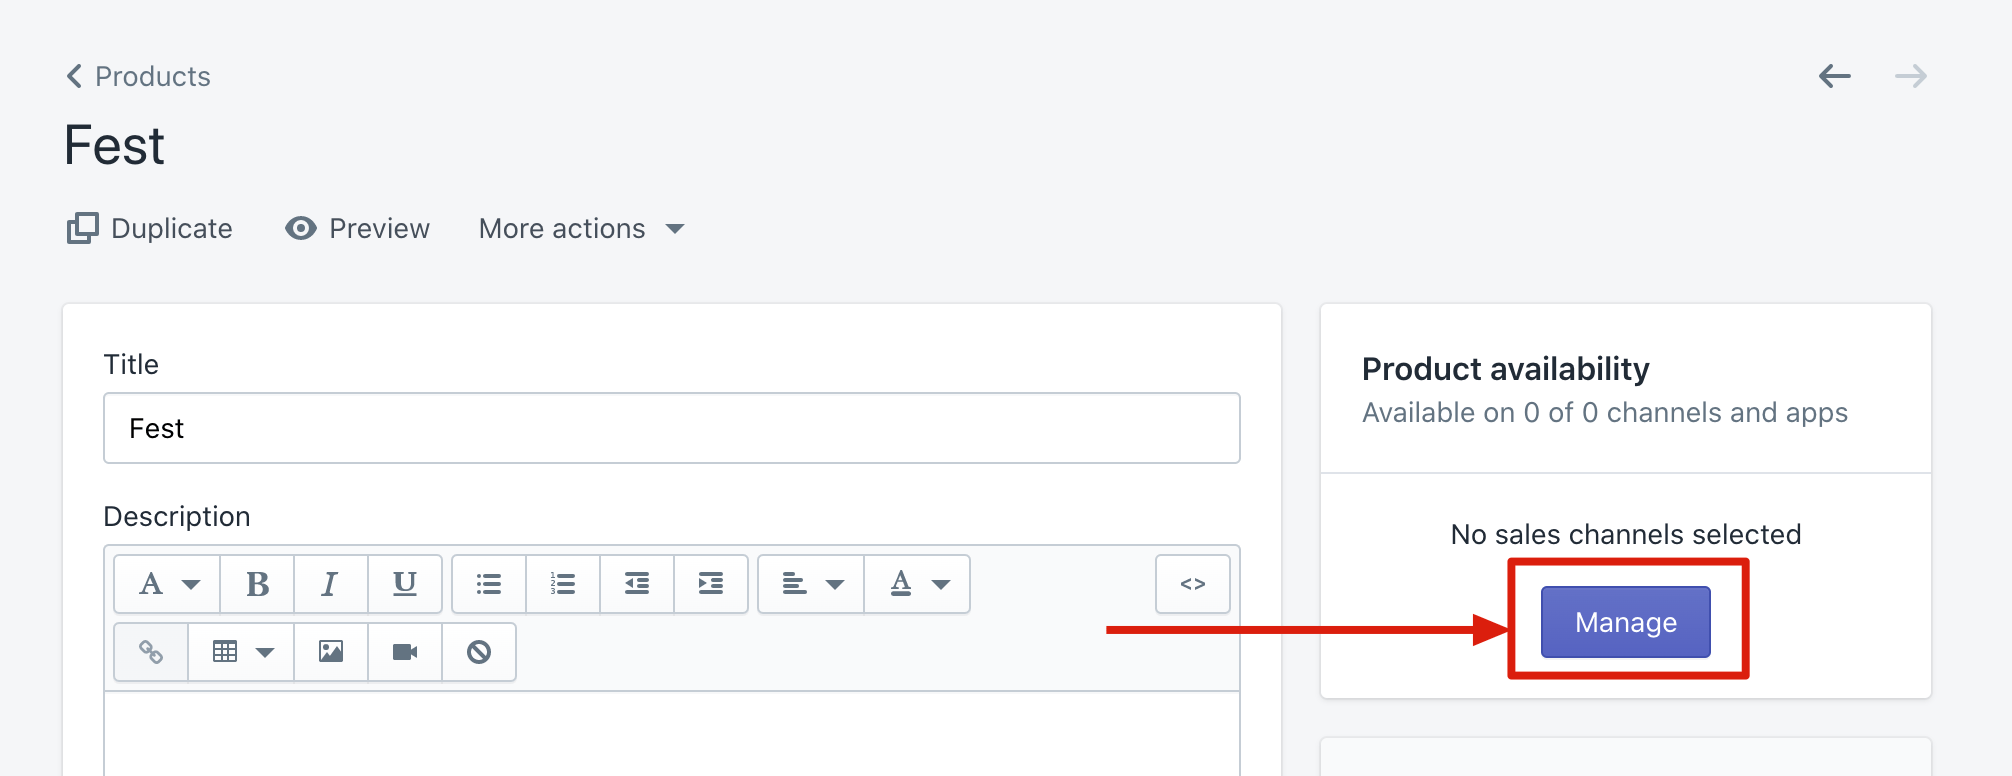
Make sure to set the product availability to Online store when you are ready to publish the event.
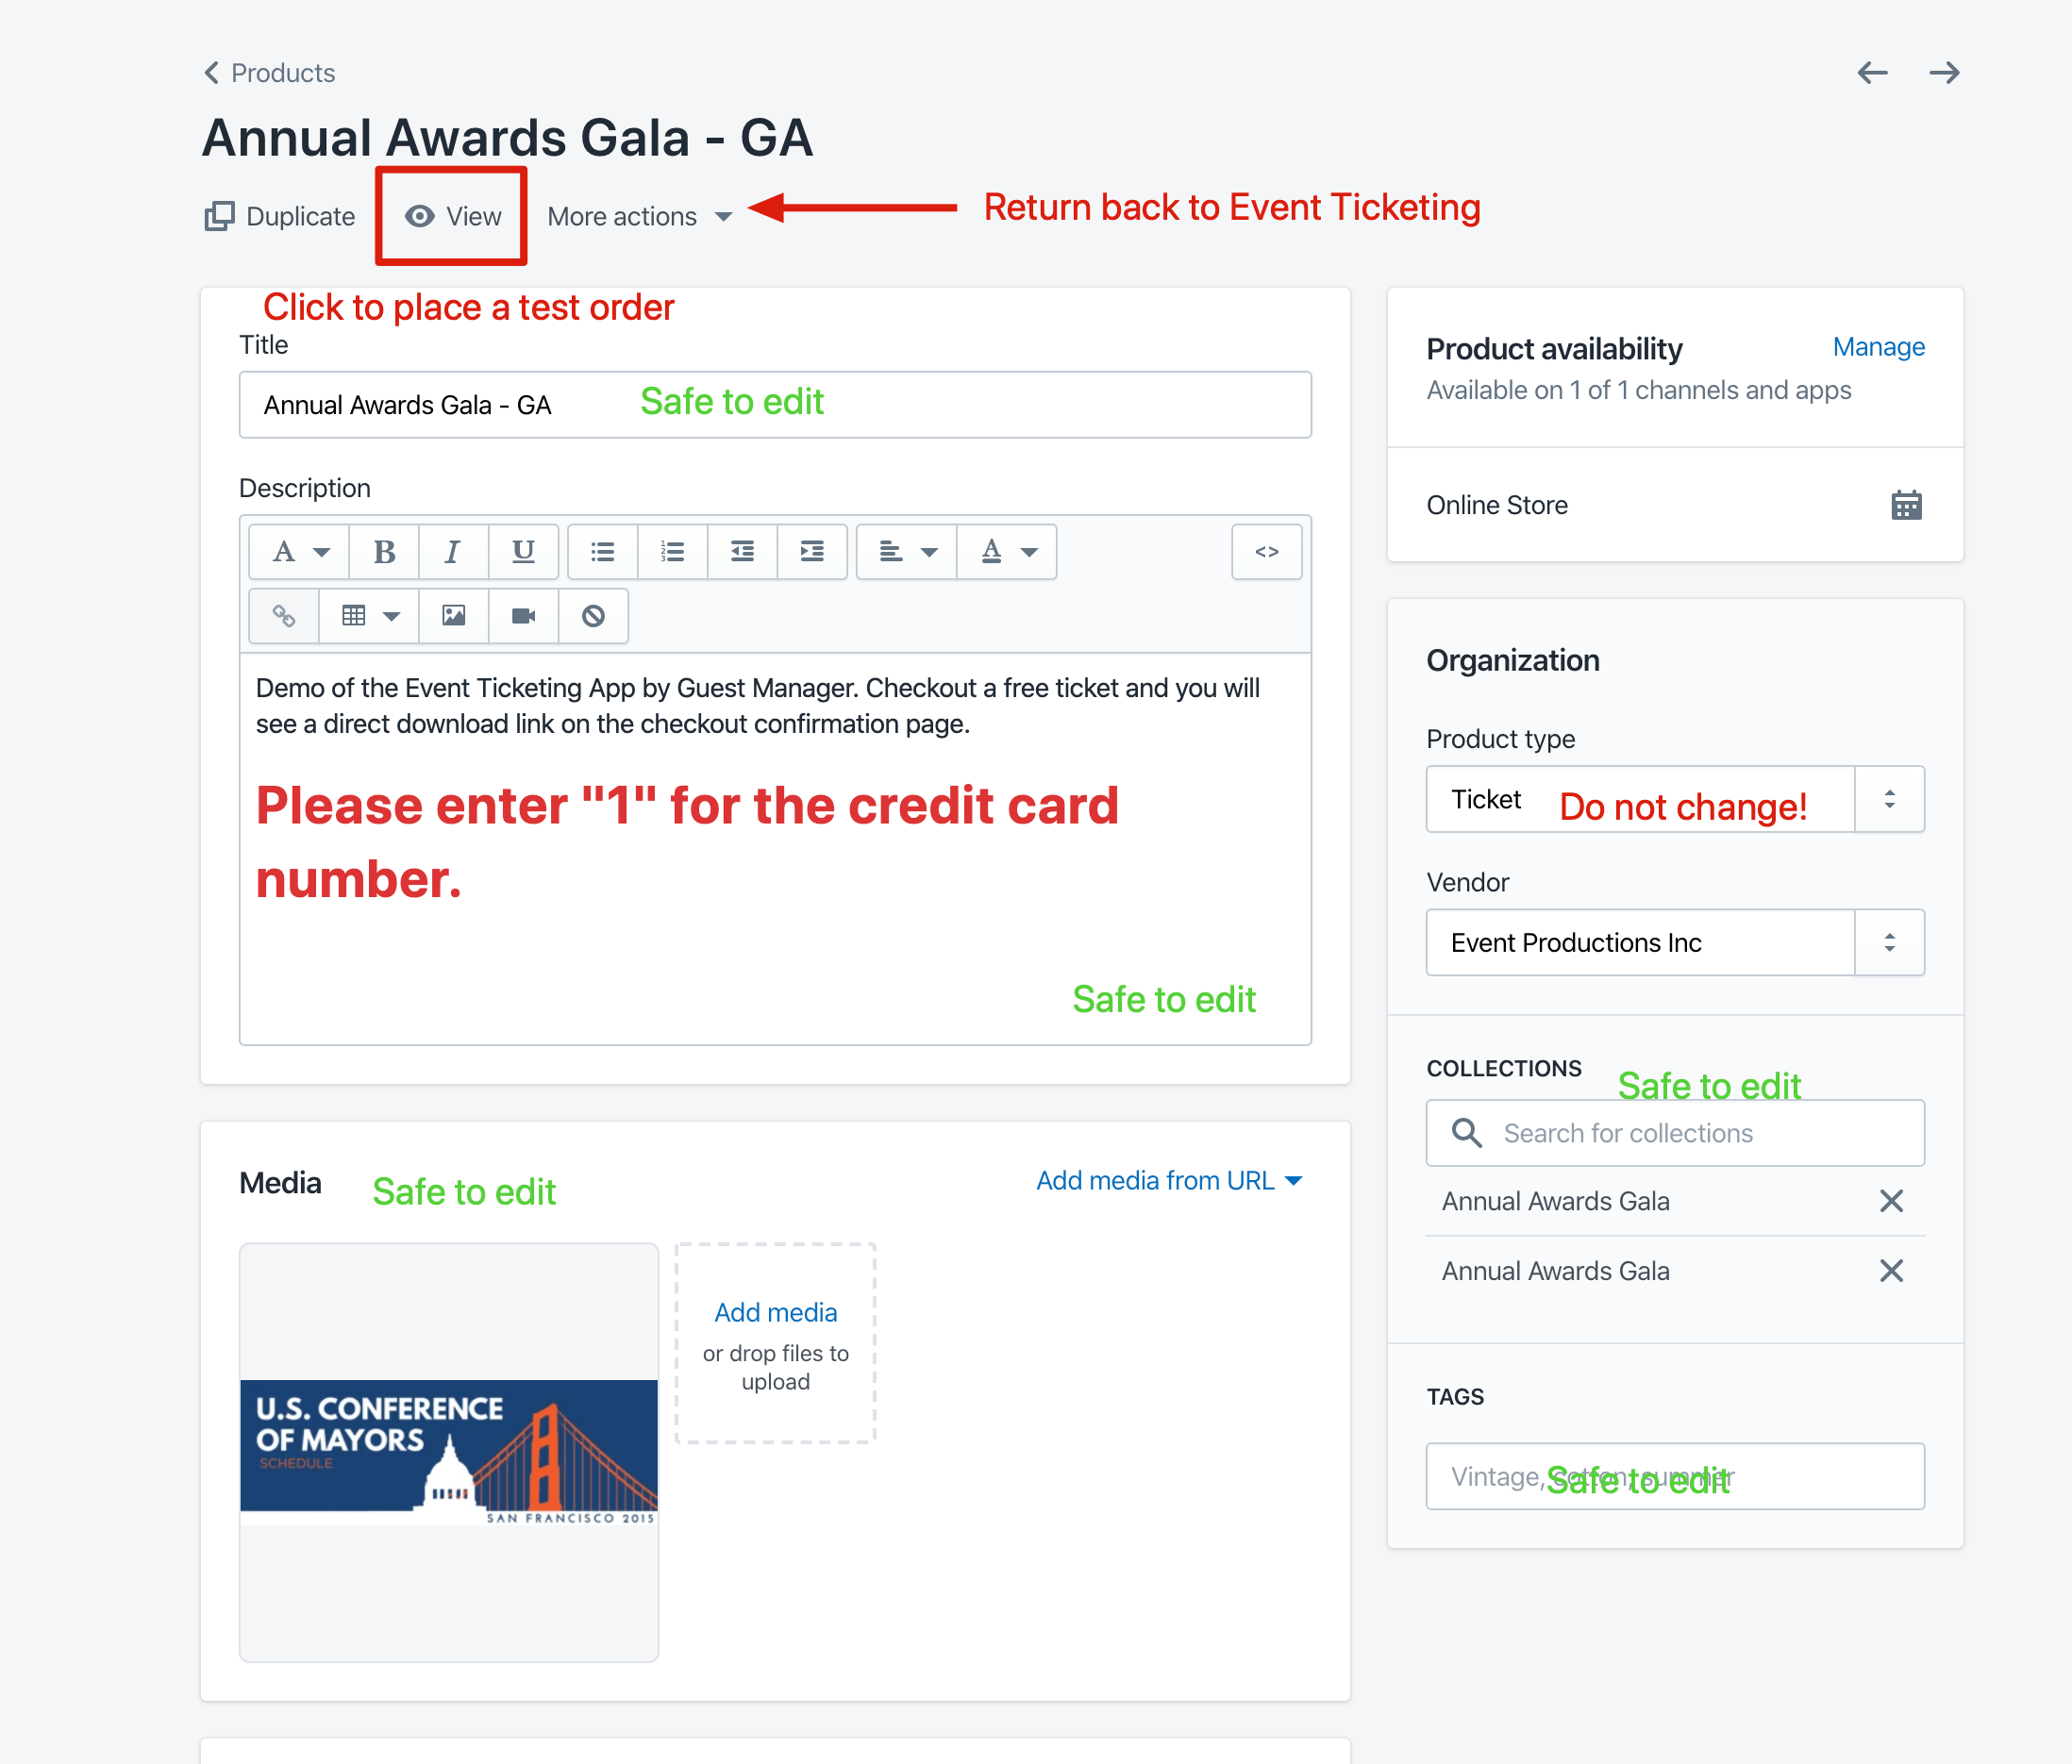
Warning! Do not change the Product type. The app relies on this to determine which orders are relevant to the app.
When editing the variants section, be very careful!
Publish the product
In order to checkout and test a ticket purchase, you need to publish the product to your online store.
Click Manage under the Product availability heading, enable the Online store, and don’t forget to save your unsaved changes:
Test order from the admin
Create a Draft Order in Shopify admin. Follow the Shopify help documentation for instructions.
Test order from the storefront
Click the View button from the Product to get to the public storefront. Checkout and purchase the ticket product. Confirm that the “Download tickets” widget we added earlier shows up on the thank you confirmation page.
Test order from Point of sale
You can sell tickets using Shopify POS for iOS and Android. Don’t forget to customize the POS email/sms receipt, so when you send the customer their receipt, they will receive a link to download the tickets.
View order in the admin
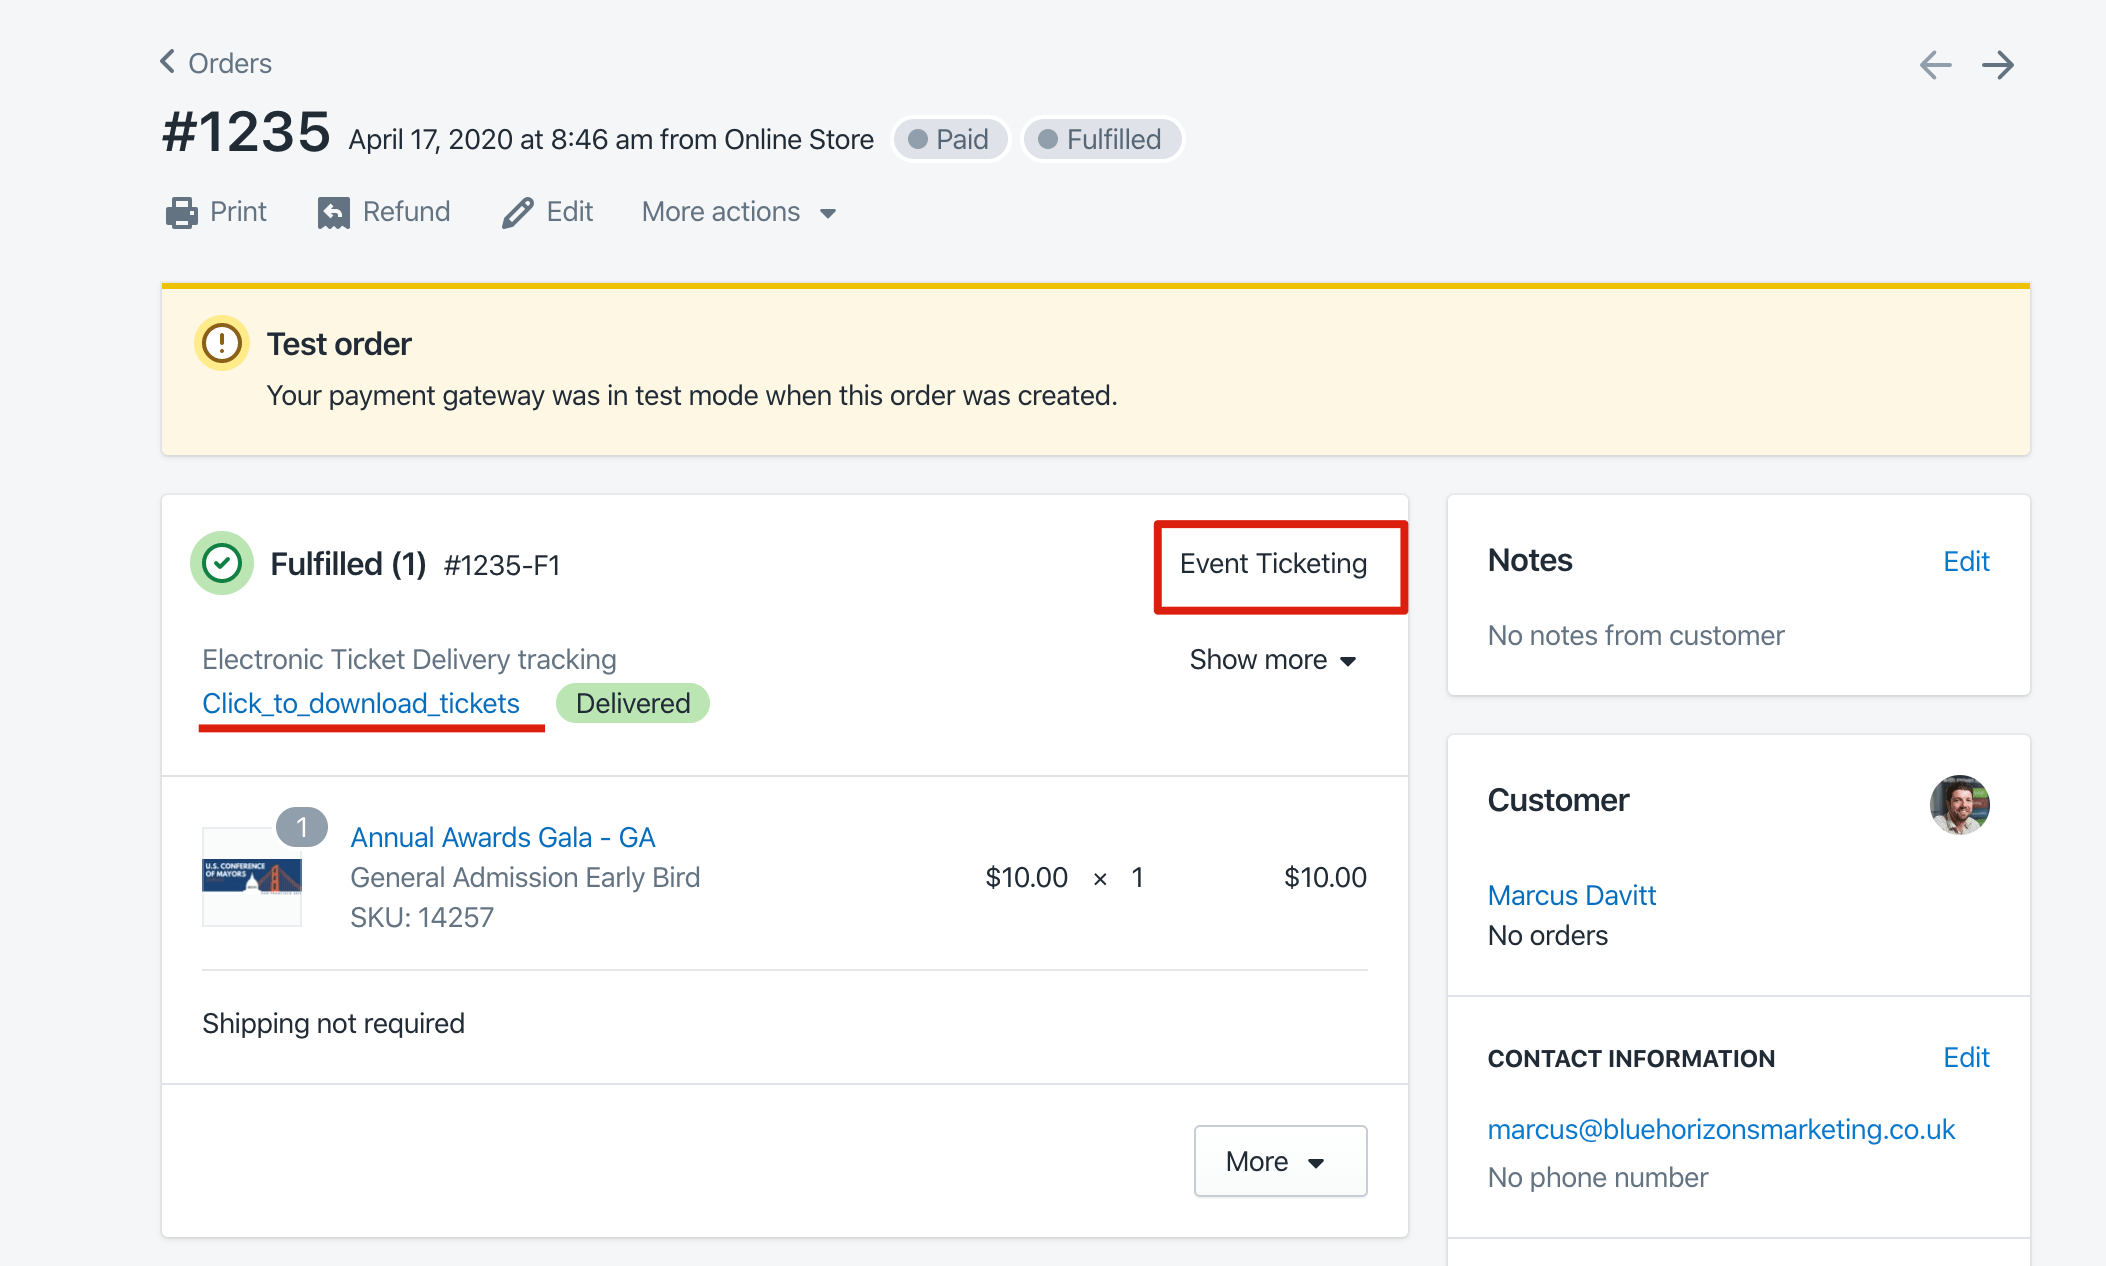
When an order is placed via the storefront, admin, or POS, the fulfillment will be automatically processed by the Event Ticketing app, based on your fulfillment preference in Settings.
The tracking link is immediately updated with a link to download the tickets. If the order is unfulfilled, then no tickets have been created yet.
Scan tickets
We provide an iOS app for scanning tickets. It uses the camera on your phone to scan barcodes - no additional hardware is necessary! For large events, we also rent laser barcode scanners that plug into an iPod Touch. Get in touch for details. Generally, events under 400 or so attendees can use the camera scanner just fine. For larger or more professional events, I suggest taking a look at our barcode scanner rental program. It’s affordable, available in the USA, and we ship fast from our home base in Lake Tahoe, NV.
We do not have an Android app at this time. Unfortunately, Honeywell (the hardware vendor we use for laser scanners), does not offer an attachment for android phones. We put a lot of time and work into making our iOS check in app the best on the market (and we really believe it is). We suggest you to consider acquiring an iPod, iPhone, or iPad to use for ticket scanning. If you are interested in an app for Android, please get in touch. If acquiring an iOS device is not an option, we do at least offer web-based check in under one of the paid plans, Premium or Business.
Install the check in app
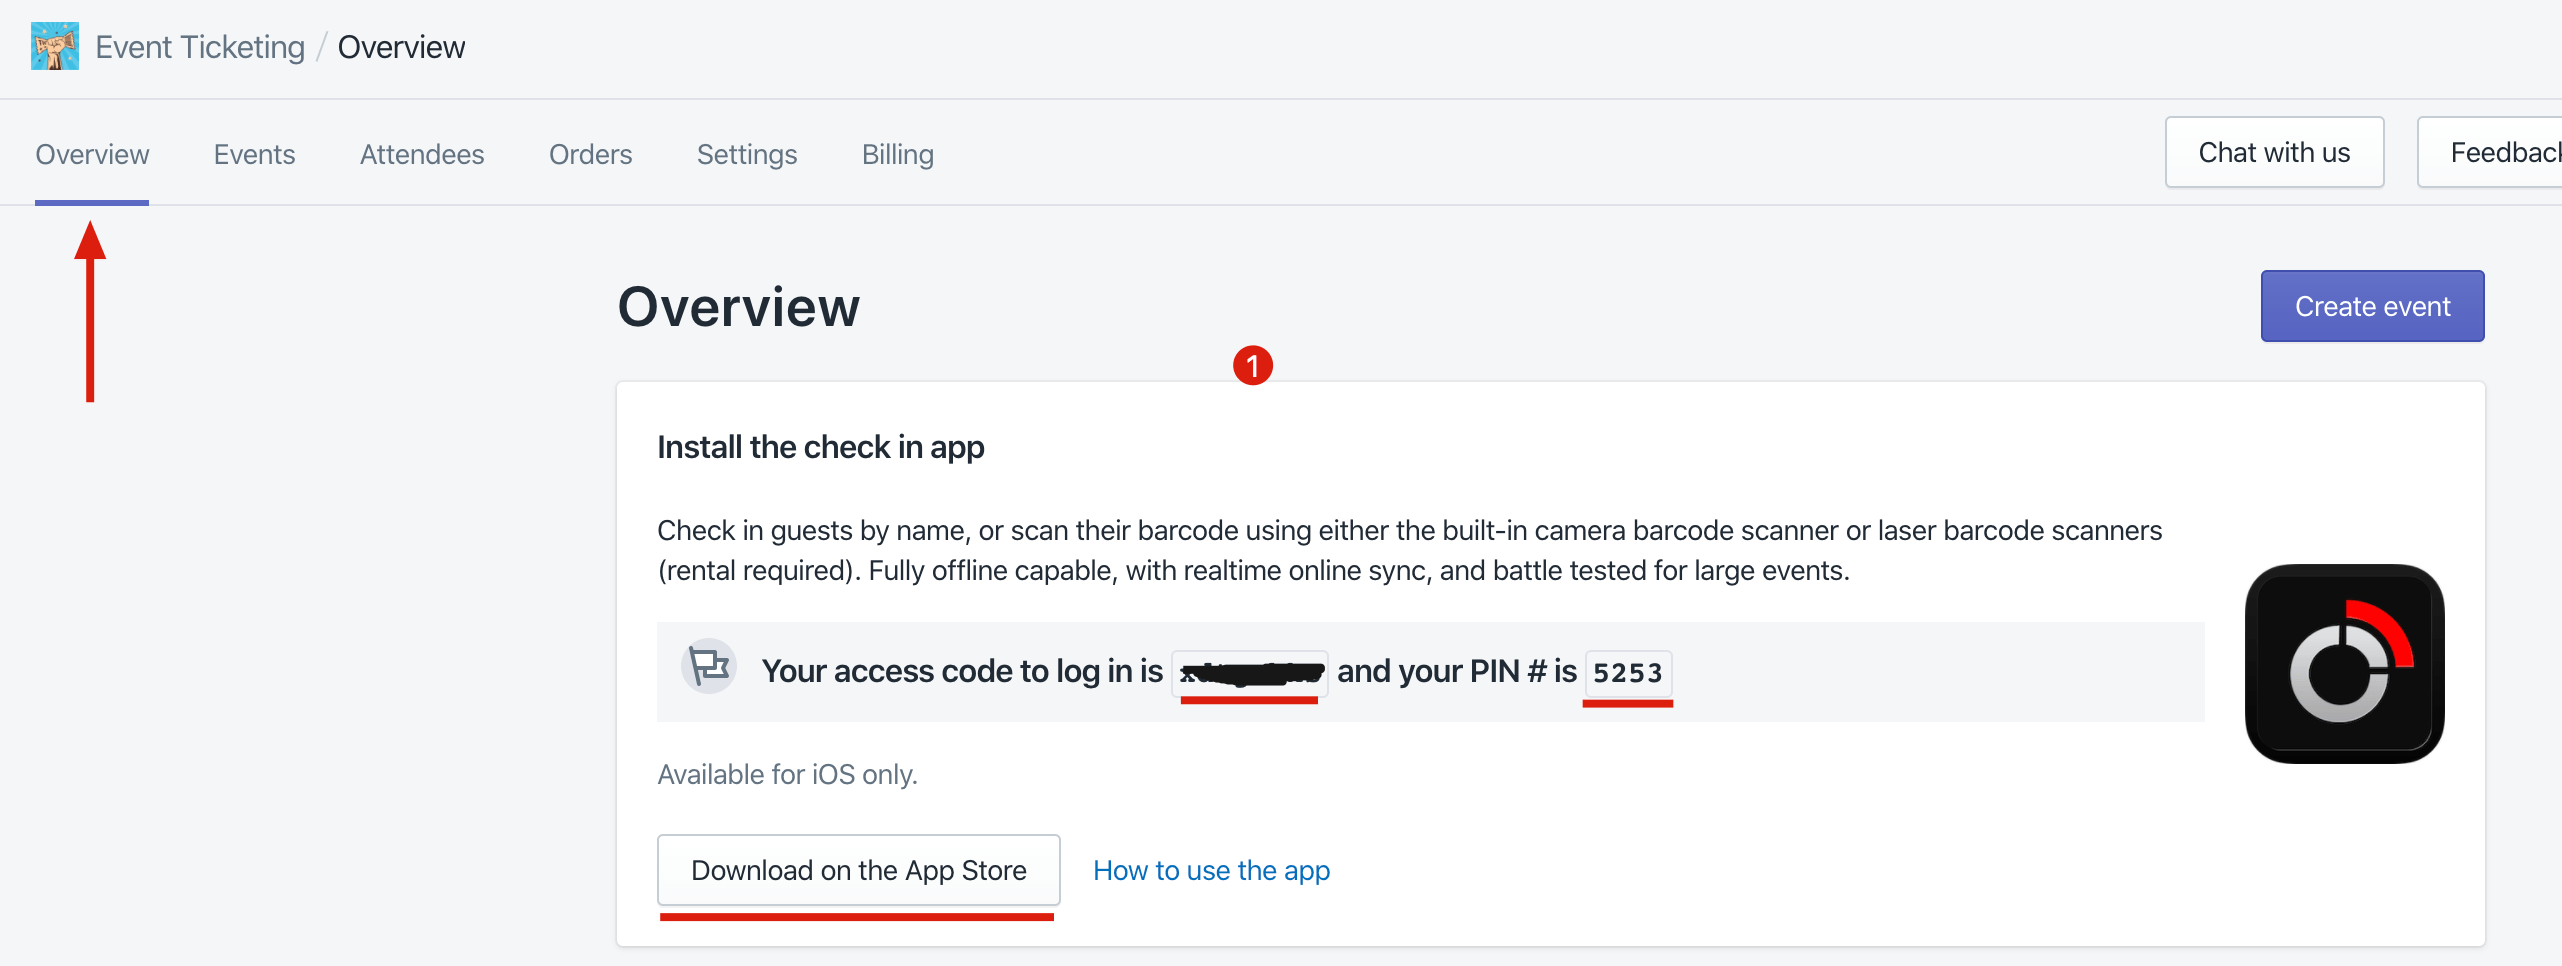
From the Overview page of the app, look for the section on the Check In App. There is an access code, PIN, and link to download the app. Follow the instructions to install the app from the Apple App Store. We also offer a check in app for Mac, too.
Don’t have an Apple device? See our note above.
This is a quick overview, for more detail please refer to the article for the check in app.
Pro Tip If you want to test out the iOS app without going through all of the above, there is a Test Drive mode in the app. You can even punch an email into the app to get a few sample tickets emailed to you for testing.
View the event report
When your event is over, you will be emailed a link to view the check in report (Premium and Business plans only). You can then export a list of attendees, if desired.
More resources
Custom development
If you are a large shop and are interested in tailoring custom features or workflows for your processes, contact us for details.
Feedback
How can we improve? Let us know your ideas on new features, and improving existing ones!


