The ticket email is an email sent to your guests that contains their scannable ticket, either as an attachment, or a link to download. You will need to set up a ticket design and/or Apple wallet design to use this email.
When is this email sent?
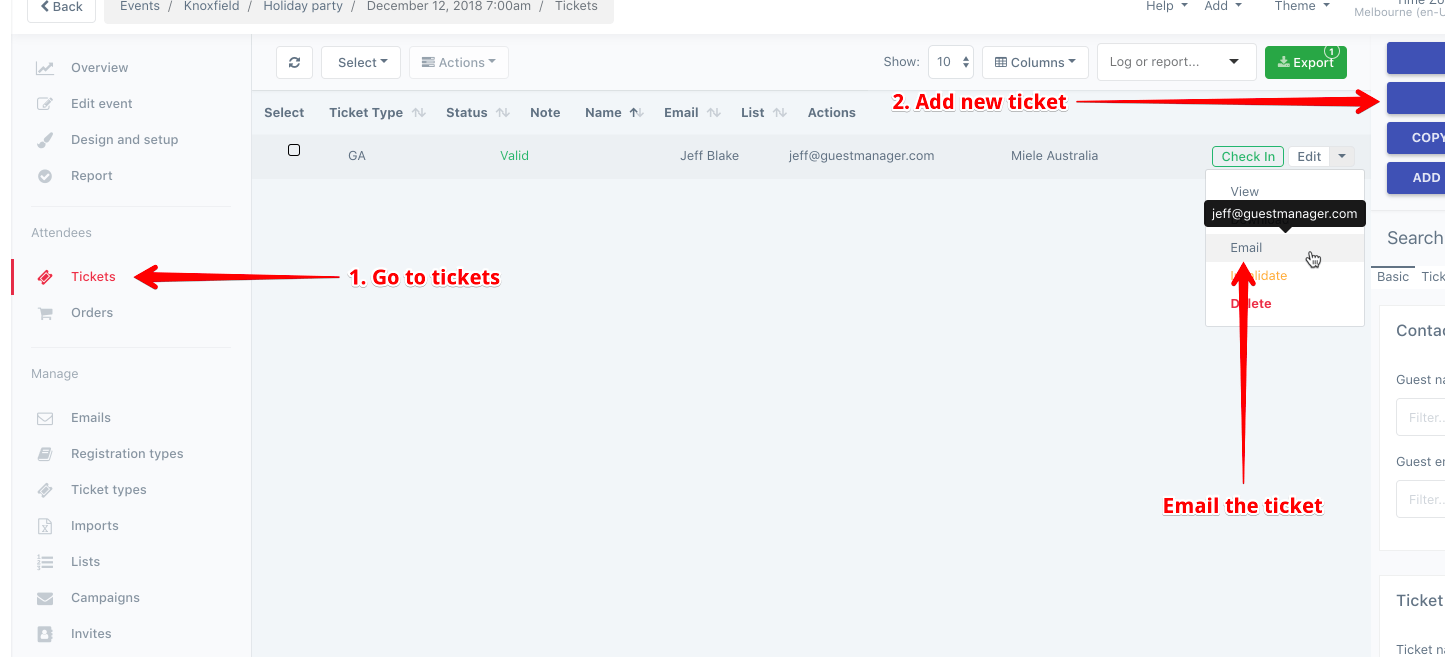
- In Tickets, click the dropdown next to a ticket and click Email
- In a tickets import, specifying the “Send Email” column to “Yes” for each row
- When a public RSVP is made on your event page
- When a guest RSVPs to a private invitation
- When a guest transfers a ticket to someone else (if enabled)
Who is the email sent to?
- If the ticket is linked to a contact, it will go that contacts email address.
- If a specific email is set on the ticket, it will go to that email instead (whether the ticket has a contact set or not)
Your options for customizing
Use our simple template
Your work is done! Our default template sends out a simple email, with the event banner graphic (if present), the ticket type content (if any), and either:
- Links to download the PDF and Apple wallet (if a design is setup)
- PDF and Apple wallet attachment
Make your own template
For full control over the email design, you can set up a template in Design and setup > Emails. There are three ways to set up your email:
- Use our editor
- Upload custom HTML
- Use our editor with your own email layout template
For any of these options, it is up to you include the appropriate tags for ticket download link. Please see the section below for dynamic variables to use in your email template.
Email layout templates allows you to setup a common template to use for many different kinds of emails. For example, the template would contain a header and footer, and a placeholder to insert dynamic content depending on what email you are sending. For more details, see the guide of setting up email layout templates.
Setting up your ticket email
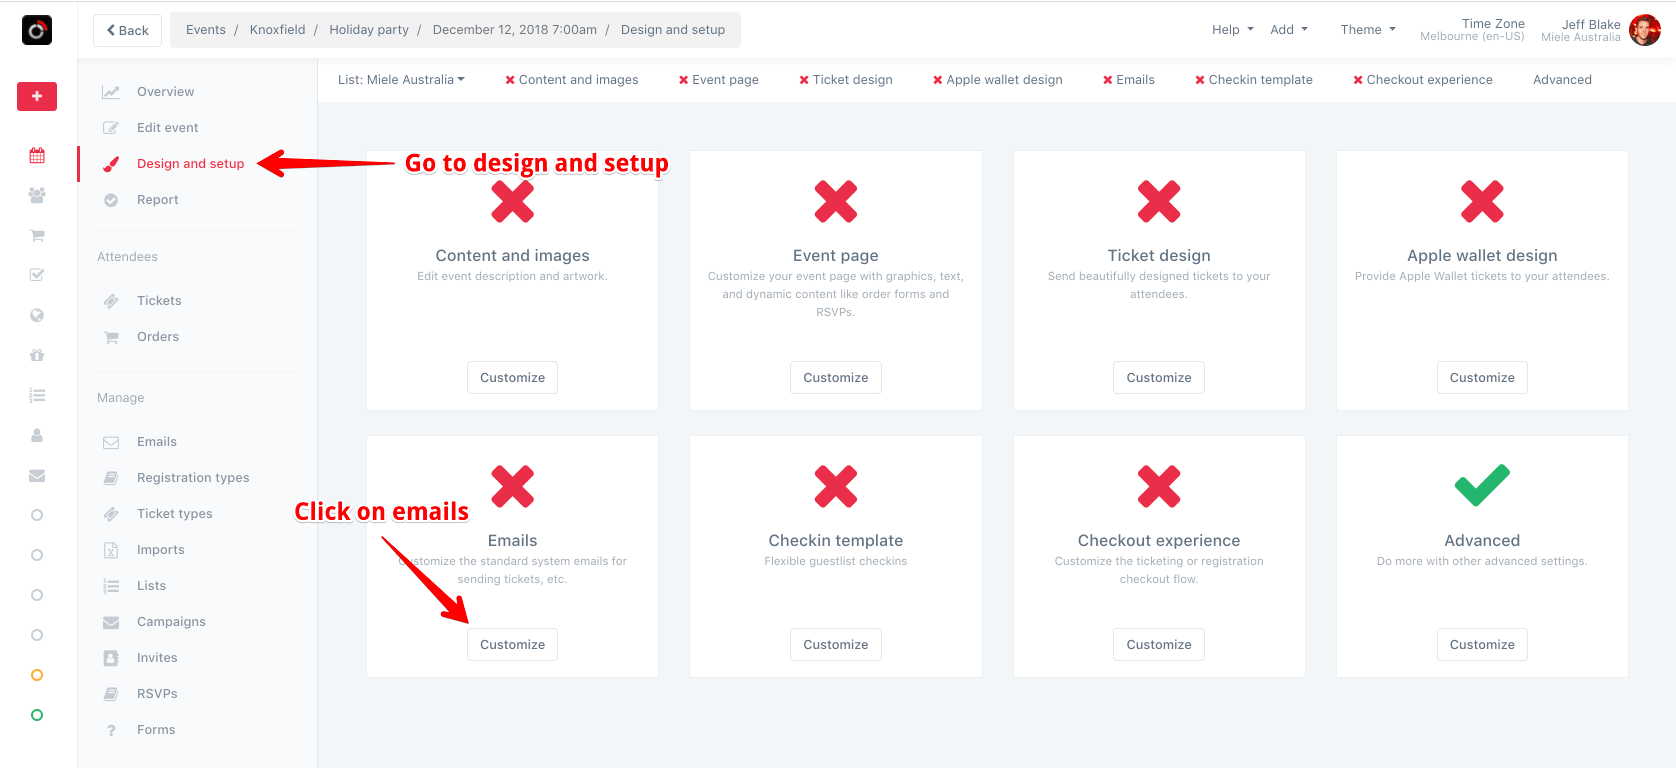
Go to Design and setup for your event

Click Emails, then click on Ticket email to expand the form.

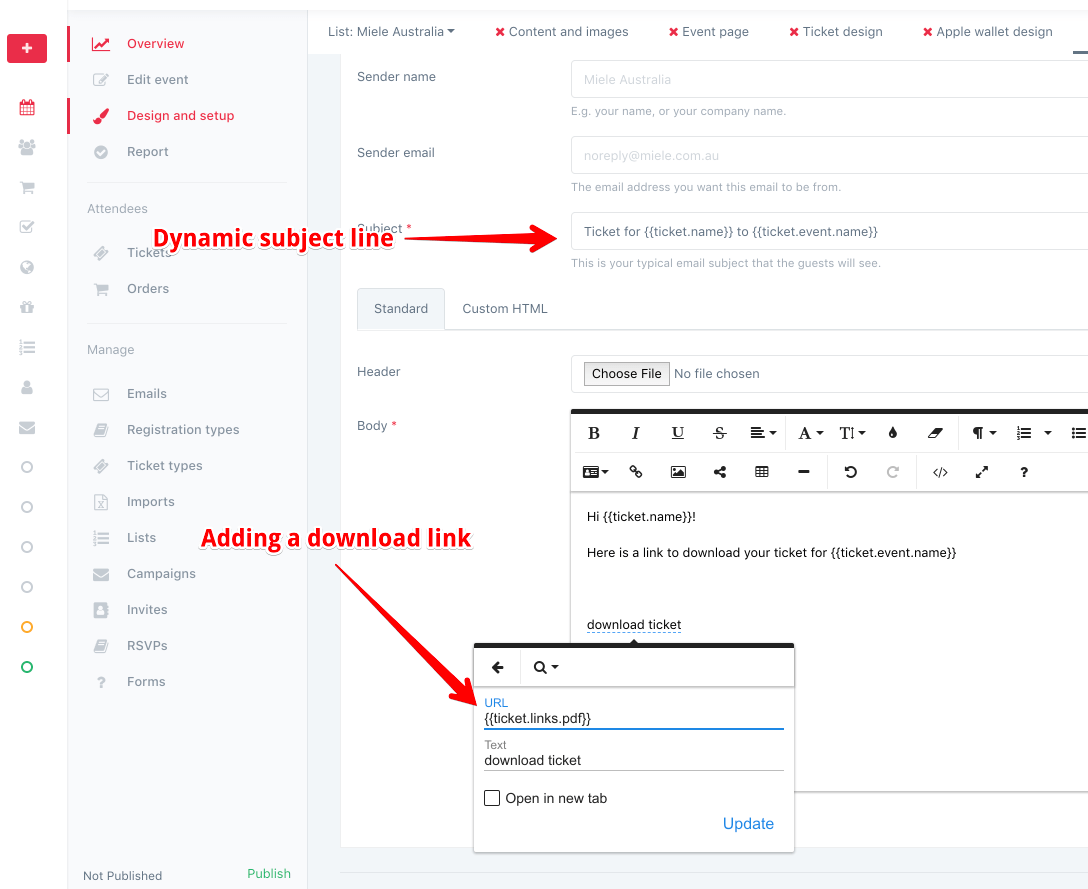
Specify a sender name and email (this can also be set globally in Settings > Company)
For the subject, you can use dynamic variables (to insert the guest name for example) or write a static subject.
Next you will choose between Standard and Custom HTML.
Dynamic variables can be used in both the standard and custom HTML designs. They are listed at the end of this article for reference. You can also insert custom fields using the toolbar.
When everything looks good, click save.
Preview your email
Create a ticket for yourself in Tickets, and then click the dropdown next to it and click Email.

Dynamic variables available
For example, if you put {{ ticket.name }} into your template, it will be replaced by the guest name on the ticket.
{{ ticket.name }} -> "Jeff Blake"
{{ ticket.email }} -> "jeff@guestmanager.com"
{{ ticket.status }} -> "Valid"
{{ ticket.links.pdf }} - URL link to download the ticket PDF.*
{{ ticket.links.wallet }} - URL link to download Apple wallet ticket.*

{{ ticket.ticket_type.name }} -> "General Admission"
{{ ticket.ticket_type.starts_at }} -> **Raw Date**
{{ ticket.ticket_type.ends_at }} -> **Raw Date**
{{ ticket.ticket_type.content }}

{{ ticket.event.name }} -> "Holiday Party"
{{ ticket.event.date }} -> 12-25-2018
{{ ticket.event.time }} -> 7:00am-10:00am
{{ ticket.event.images.banner }}

{{ ticket.event.venue.name }}
{{ ticket.event.venue.address.address1 }} -> "123 Main St."
{{ ticket.event.venue.address.state }} -> "WA"
{{ ticket.event.venue.address.city }} -> "Seattle"
{{ ticket.event.venue.address.country }} -> "US"
{{ ticket.event.venue.images.map_icon }} -> URL

{{ ticket.custom_fields['Your field name'] }} -> Field value

* If a corresponding design is not setup, this value will be blank.
Basic sample
Hi {{ ticket.name }}! Here is your ticket for {{ ticket.event.name }}. Download it here: {{ ticket.links.pdf }}
Customizing dates
Any attribute that ends in _at , such as ticket.event.starts_at is a raw date and should be formatted.
For example,
{{ ticket.event.starts_at | date: "%a, %b %d, %Y" }} would look like this: Fri, Jul 17, 15
For more information, see: https://shopify.github.io/liquid/filters/date/
Tool to help build your date format: http://strftime.net/
Using custom fields
All custom fields on a ticket can be accessed via the {{ ticket.custom_fields }} property. This is a hash, so if you wanted to access a custom field named “Company”, you would do {{ ticket.custom_fields['Company'] }}
Advanced usage
For conditionals, filters, and more, please refer to the Liquid Reference Guide